When you click on links to various merchants on this site and make a purchase, this can result in this site earning a commission. Affiliate programs and affiliations include, but are not limited to, the eBay Partner Network.
Hummer H2For those who like a little more gleam to their Hummer, the H2 offers a similar rugged look as the H1, but as a lower cost, and with more added features, making it almost a massive luxury SUV.
Maybe so? I put an 05 Escalade engine in my Jeep an all the fuel and I believe a/c connections took the type I showed. I think what it amounts to is that clip needs to pop up the only way it can.. I see that black push pin clip at the bottom of your picture and I get excited because I�m short 2
I've always just used a pick or a tiny screwdriver to release those sort of fuel line clips. I always figured there was an actual tool specifically for them.
Should I expect the white part to come out? Or is it a button? I�m having a hard time getting the rust bits out of the disconnect plug. I�m afraid I may need to get a repair kit or something. I�d like to clean up what I have though.
I�m considering reusing the connectors. I cleaned them up pretty good. I test fitted them on the new pump they slide and lock fine. I may put them on and add a zip tie or some stainless safety wire to secure the button... I noticed you can insert one or the other on the bottom. Going to look at it again today. Assuming I can just heat up the nylon gas line and insert the connectors back in the fuel line. May also add a hose clamp for good measure.
I was able to re use the connectors after cleaning them up (had to remove them to do it properly). I wiped down the inside of the tank several times and sat the pump in. Later today I�ll start the frame. Finally. What will side track me next...
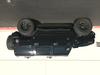
thanks for the pictures. are the fuel lines metal? or just fuel hose. did you replace the lines. I assume they are regular fuel line? I havent pulled my tank yet, but its comming. I havent looked close yet, but its leaking fuel from something in the front when the truck is running. I guess the fuel lines from the tank to the next place are metal? anyway it all comes out .
The lines are nylon on the tank, the supply line turns to metal just forward the tank in the driver side. The quick connects are plastic. Unsure how far along you are but it�s 3 13 mm nuts and one 10 mm nut to get the gas tank shield off, then it�s (I think) 2 15 mm studs (deep socket) to remove the straps. I used a floor jack to lower the tank (had about 3-4 gallons in it). Once the straps are off, you can drop it a little and reach in to unplug the two electrical plugs... and you will need to release the quick connects from the top of the pump... my lines just fell off the top of the pump, it was rusted through. To remove the connectors you push the white part down... and hopefully you can pull them off. Once the fuel lines are off you can just drop the tank.
Good luck. If it�s leaking from the front I think there is s metal line you will need to replace or patch. I haven�t done that one... yet
I started the rear frame section tonight. Since I have no air tools I am going to do the cleanup process 4 phases.
1. Small ball ping hammer... tap all the scale and bubbles up metal to free up the rust.
2. Scrape the rusted areas and remove some old undercoating.
3. Use the yellow Eastwood disk to remove rust (will only be able to get flat areas and will not be able to get in corners or tight spaces).
4. Eastwood drill mounted wire brushes.
once I get past all this it will be as good as I can get it with the body still on the frame. I am not going to put a lot of work into the suspension, I�ll just start replacing parts after I get the frame clean... much easier and not that bad to do. I�ll then clean the frame with water and soap, then after dry I�ll use the Eastwood metal prep... then I�ll use aluminum foil and paper to cover up stuff I don�t want to paint.
1. First layer will be rust Encapsulator platinum.
2. Then Eastwood�s extreme chassis black
we will see how close I can stick to this. Or how many times I get side tracked due to something else I find.
Seinging the hammer is the is the hardest part. But most important. It�s important to remove the scale... so that�s my focus so far. I wish I could get it super clean... but realistically... I can only get to or see do much. No matter what I�ll add years to the Hummer and it will look a lot better.
Rear stainless brake lines on order, I noticed both lines rotted and were leaking. I picked a small piece of rust off one line and fluid started running out... wonder what else I�ll find


 I am going to do the cleanup process 4 phases.