When you click on links to various merchants on this site and make a purchase, this can result in this site earning a commission. Affiliate programs and affiliations include, but are not limited to, the eBay Partner Network.
Hummer H3For the Hummer driver who wants the rugged look and off road capabilities of the Hummer, but in a smaller size and with a more fuel economy friendly engine.
Clean? Did you test it? Fuel pressure should go to 55-60psi on the gauge koeo. KOEO sends signal to ->bcm->pcm->relay->fpm.
You have a very rare situation, could be caused by aftermarket tampering?
It sure seems so... I tested the fuel pump relay and it has "perfect" continuity.
The pump goes to 57PSI immediately when I command the fuel pump on (never goes to 10 PSI). With KOEO, the fuel pump occasionally only gets to 10 PSI (a good amount of the time it goes to 57 PSI, though).
With the order you describe (->bcm->pcm->relay->fpm), does the PCM send varying voltage to the fuel pump power or is it supposed to be constant ~12V? I know the fuel pressure is directly related to amount of power supplied, so maybe the PCM is sending inconsistent power during those times (possible due to bad wire or connection or a bad PCM?).
This H3 has an old CompuStar remote start (2-way) with alarm system. This is an "aftermarket" item, for sure.
There are two other considerations I have now regarding the previous owner's 3.5L to 3.7L swap.
There are two important things touched in this swap:
1. Intake cam sensor slot is manually drilled out and surfaced. -> possible risk here is the distance between the cam sensor and the cam sprocket could be off
2. Swapped '08 x4 reluctor wheel for '07 x5 reluctor wheel. -> possible risk here is the mechanical timing could be off (I compared photos of the timing sprockets to other functioning swaps and they look identical, so I am comfortable ruling mechanical timing out 90%).
This is the location of the drilling/grinding for the installation of the cam position sensor.
Last edited by Dylan Rogers; Jul 14, 2021 at 10:10 PM.
I removed the intake cam position sensor (the one previous owner added to this engine to partly "convert" it to a 2007-style engine).
Right away I notice the unevenness of the mounting surface (not much material grinded off where the mounting bolt secures and a lot more removed where the sensor sits). The RTV between the mounting surface of the timing cover and the mounting surface of the sensor is thick and angled (due to the uneven mounting surface). This means the sensor is "pulled" away from the timing sprocket (potentially too far away?). Additionally, the angle the sensor rides in the timing cover may be another issue.
I am going to do my best to even out this surface with a grinder and flap disc after figuring out sensor depth to ensure the sensor is close enough (1/16th of an inch) to the sprocket. At very least I will know the intake cam position sensor is mounted properly. I may also install a number of o-rings to sandwich onto the cam sensor to aid in alignment. Otherwise the sensor has some wiggle room to tweak out of position with only RTV.
Removal of intake cam sensor. Cleaning existing mating surface with alcohol.
I adjusted the positioning and air gap on my intake cam sensor. It looks a lot better and is much closer to the factory setup. So far it has started about 10 times on the first crank with no issues. I will see if this spurt is a coincidence or if the issue is resolved in the upcoming days.
With the intake off again and the valve cover removed, I decided to clean the intake ports out really well. I made sure the valves in each port were closed and had at it with some carb cleaner and a tooth brush. I also replaced the valve cover gaskets while I had everything apart.
To relocate the intake cam sensor, I used a rasp on a 90-degree drill adapter. The rasp removed material really well and I was able to test fit several times until the position was close enough. I used a flap disk on a grinder to remove material from the outer surface of the head in which the sensor mounts to in order to allow for the proper air gap between the sensor and cam sprocket. I used gray RTV to fill the newly created gap (due to the ovalization of the sensor hole).
I performed the crank variation relearn upon re-assembly, and everything seems to be functioning well with no current DTC's. I'll post some photos tomorrow when I'm home.
Here are photos from this ordeal. Glad to have it re-assembled... I shouldn't have to touch it for a while now (hopefully).
Used a rasp, 90-degree drill adapter, and cordless drill to ovalize the mounting hole for the intake cam sensor. I then set the "air gap" for the sensor by removing material on the "mounting face" of the cylinder head. I continued checking sensor positioning periodically until the sensor was oriented in a manner similar to the factory setup on a 2006 3.5L engine. With the valve cover off, I decided to replace its gaskets. I spent a bit more time cleaning out the deep sections of the intake ports while I had the manifold off again. Re-assembled & starting properly.
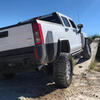
An aggressive driver in a Jetta crashed into me from behind last week. It sent me into the oncoming lane of traffic (luckily unoccupied at the time). His insurance paid for much of the damages already but I have to have an inspection done for the remainder (additional issues: muffler is beat up, exhaust is bent, rear shackle was hit, broken tow harness connector, mud flap is melted, and a strip of tread on my tire also melted). I was in a 30-mph zone and he hit me so hard my tire was on his hood...


 I am sooo excited about it! I've started it about 20 times now and it has started on first crank each time.