
Aussie H3 Project


Thread Starter
|
Senior Member
Joined: Apr 2012
Posts: 275


Senior Member
Joined: May 2012
Posts: 2,005
how nice,,
here while "they" pretend to try raising taxes as a diversion,"they"instead steal our wealth thru inflation. i log certain food items that i use, going up 20 to 35 % last year.
when i show young people a "real" silver quarter and tell them it still buys a gallon of gas they start to wake up.
those old quarters are sold for 4-5 bucks at coin shops. gas today is $3.89

Thread Starter
|
Senior Member
Joined: Apr 2012
Posts: 275
Ok back on track.
Things are moving slowly, but they are moving, have measured up the H3 rims on the trailer, and it seems they should fit, so have ordered new trailer hubs to suit the H3 rims, should turn up in a week or so.
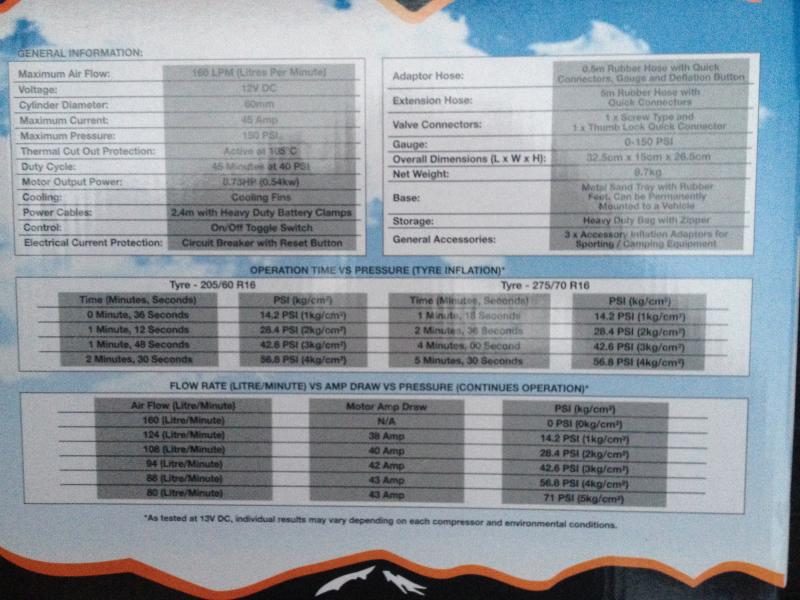
Have also picked up some bargains today, as our local store had a stock take sale so I got a winch at below half price and about 40% off an air compressor, to air down tires and pump them up again


Things are moving slowly, but they are moving, have measured up the H3 rims on the trailer, and it seems they should fit, so have ordered new trailer hubs to suit the H3 rims, should turn up in a week or so.
Have also picked up some bargains today, as our local store had a stock take sale so I got a winch at below half price and about 40% off an air compressor, to air down tires and pump them up again


Thread Starter
|
Senior Member
Joined: Apr 2012
Posts: 275
Well I have finally convinced someone to send me some factory GM offroad driving lights, the ones that mount on to of the windscreen.
Everyone wanted $450-500 to post to Australia and some would not even reply to emails, I have now payed $70 postage, and that also includes some other bits and pieces I have ordered as well, so it appears I have the factory offroad lights on the way.
My h3 already has the mini grill lights but have not connected them yet as I only wanted to pull the dash apart once, while dash is apart will hopefully swap out my head unit and add MP3 input as well.
 , lucky I used PayPal and got a 100% refund after the seller refused to send the item as they stuffed up on the postage quote, I lodged a dispute and got refunded by PayPal
So after more searching the net I found another set, and payed $200 postage, I used PayPal again just in case, will see if this lot turns up.
In the mean time, my trailer hubs turned up, fit the wheels perfectly, also fit the trailer, but the bearings are slightly the wrong size for my axle, so will have to source some bearings to suit, they were however close enough for a trial fit to check clearance, can't drive on them though as they are too lose.
Anyway here is a photo of my trailer with a H3 wheel fitted, with standard factory issue tire.
Here are the hubs:

Here is a wheel fitted up, all seems to be good:

And my winch plate also turned up last week, so once I am on leave from work the winch will be fitted up:

Project H3 is nearly done now
To do list:
- fit winch
- fit roof mounted off road lights (if they turn up)
- connect mini grill off road lights already fitted
- buy matching spare 33" tyre
- buy and fit brush guard mounted long range driving lights
- finnish trailer (technically not part of H3 project but a whole project in itself)

Senior Member
Joined: Mar 2006
Posts: 749
Your rig is looking awesome!
Regarding the GM roof lamps, you may have actually saved yourself some aggravation by stopping your order. Our new '09 came with the lamps installed already and I have mixed feelings about them.
Pros: They look great, are factory, and are bright enough to actually be useful
Cons: Man, they sure make a loud racket driving down the highway! When driving into a headwind they make even more noise. Aside from typical wind noise, they also sometimes make plastic crunching and flapping noises too. They also light up the hood and if you have a chrome trim panel, the light reflects off of it's back edge right into your eyes. If the lamps and windshield are even slightly dirty, stray light illuminates the front windshied so you see every smear and bug splatter.
When I get the chance, I'm going to paint the back edge of my hood trim panel flat black and also reinstall the lamp assembly with some trim sealant around the edges to stick it down better. Maybe that will help with the wind noise issue.
Thread Starter
|
Senior Member
Joined: Apr 2012
Posts: 275
Your rig is looking awesome!
Regarding the GM roof lamps, you may have actually saved yourself some aggravation by stopping your order. Our new '09 came with the lamps installed already and I have mixed feelings about them.
Pros: They look great, are factory, and are bright enough to actually be useful
Cons: Man, they sure make a loud racket driving down the highway! When driving into a headwind they make even more noise. Aside from typical wind noise, they also sometimes make plastic crunching and flapping noises too. They also light up the hood and if you have a chrome trim panel, the light reflects off of it's back edge right into your eyes. If the lamps and windshield are even slightly dirty, stray light illuminates the front windshied so you see every smear and bug splatter.
When I get the chance, I'm going to paint the back edge of my hood trim panel flat black and also reinstall the lamp assembly with some trim sealant around the edges to stick it down better. Maybe that will help with the wind noise issue.
Regarding the GM roof lamps, you may have actually saved yourself some aggravation by stopping your order. Our new '09 came with the lamps installed already and I have mixed feelings about them.
Pros: They look great, are factory, and are bright enough to actually be useful
Cons: Man, they sure make a loud racket driving down the highway! When driving into a headwind they make even more noise. Aside from typical wind noise, they also sometimes make plastic crunching and flapping noises too. They also light up the hood and if you have a chrome trim panel, the light reflects off of it's back edge right into your eyes. If the lamps and windshield are even slightly dirty, stray light illuminates the front windshied so you see every smear and bug splatter.
When I get the chance, I'm going to paint the back edge of my hood trim panel flat black and also reinstall the lamp assembly with some trim sealant around the edges to stick it down better. Maybe that will help with the wind noise issue.
")
Thread Starter
|
Senior Member
Joined: Apr 2012
Posts: 275
Unfortunately been very very busy with work doing heaps of OT and sleeping little with no time to play Hummer.
But have had a few extra $$$ to buy stuff
I did however get the trailer all sorted, the standard Hummer tyres were too big, so I got some smaller tyres for the trailer.
Here it is behind the H3, without the camper top on.

Picked these up as well:


Just sitting there, I think I like the look of them:

And some driving lights for the brush guard, two pencil beam and one spread beam:

Now just have to find the time to to fit all the new goodies

Junior Member
Joined: Nov 2010
Posts: 20
The off road lights (up top) are not too hard to install and I have had no problems with them (no rattles or excessive wind noise).
Below are my notes about the install from a couple of years ago, only other thing I would add at this point is to use silicone on the six bolt cover caps - don't just snap them in there and forget about them - they can pop off and it is not fun trying to get just the caps.
Just got done installing the roof lights (P/N: 19171860). Instructions are pretty good, but I did some things differently. The biggest thing that I disagree with in the instructions are the directions to use a screwdriver and pry around the radio plate and the instrument panel end plate. There is no need to pry on anything, all you are going to do is leave pry marks around the radio/hvac bezel and the I/P end plate. To get the radio bezel off � stick two fingers in the cigarette lighter sockets and pull up and back � it will pop right out. On the I/P end plate � at the very bottom there is enough room to get your fingers in there and pop it off. I like the OEM light switch that matches everything else � it goes in one of the knockouts on the bezel. I put a zip tie around the connector after I snapped it in to prevent it from getting knocked back into the bezel if you push it too hard. Also � there will be some wire slack on the switch wiring � leave that slack behind the bezel so that if you pop the bezel off in the future � you don�t get a nasty surprise. Pretty much kept to the rest of the instructions. I ran into a snag on the BEC (fuse box main board). It would not go back in after I plugged in the light connector. Took me a while to realize that if the BEC comes off as a single board with no wires attached and there are two wire connectors attached to the bottom of the fuse box � those connectors have to be unlatched from the fuse box and snapped onto the BEC before you remount the BEC. You cant just press fit the BEC back onto those connectors while they are attached to the fuse box.
