What have you done to your h2 today?
#91
 05-03-2015, 07:55 PM


I went with oem ac delco from the dealer. i recall reading that people had problems with aftermarket bumpstops or they just didn't ride as well. Oem were $38.74 each here from dealer. Takes like 10min. Per side to change. Doesn't get any easier.
Yesterday, I sealed my roof lights up. Hopefully no more leaks.
Repainted my drivers rocker panel.
Yesterday, I sealed my roof lights up. Hopefully no more leaks.
Repainted my drivers rocker panel.
Thanks, for info...
#92
05-06-2015, 07:05 AM
Here's what i used.
1" body lift spacers (12x) http://www.summitracing.com/int/part...bb01/overview/
M12-1.75x140mm bolts (12x) http://www.fastenal.com/products/details/0122037
Stainless steel flat washers Stainless Steel Flat Washer 50 Pcs 12mm | eBay
Don't forget to torque all the bolts to 63 lb.ft.
Hope this helps!
1" body lift spacers (12x) http://www.summitracing.com/int/part...bb01/overview/
M12-1.75x140mm bolts (12x) http://www.fastenal.com/products/details/0122037
Stainless steel flat washers Stainless Steel Flat Washer 50 Pcs 12mm | eBay
Don't forget to torque all the bolts to 63 lb.ft.
Hope this helps!
when you get a chance, can you give me some incite, into what I am gonna encounter when installing the lift, I am very able, mechanically, I have no fear tackling projects..
Just would like to hear from those who did the installation previously, they know the headache areas of the installation. .
Thanks Eric

#94
05-06-2015, 10:04 AM

when you get a chance, can you give me some incite, into what I am gonna encounter when installing the lift, I am very able, mechanically, I have no fear tackling projects..
Just would like to hear from those who did the installation previously, they know the headache areas of the installation. .
Thanks Eric
Just would like to hear from those who did the installation previously, they know the headache areas of the installation. .
Thanks Eric
1. Loosen all the body mount bolts but don't remove it.
2. Remove the bolts (6x) on one side you want to start only, left or right side.
3. Jack the body on the side-middle with 4x4 block of wood just enough to place the spacers.
4. Insert the body lift spacers.
5. Install the bolts but do not tighten it yet.
6. Move to the other side and do the same procedure.
7. Torque all the bolts to 63 lb.ft.
Make sure to check the clearance of the fan shroud to the radiator fan. I don't have any issues on mine as i have the electric fan.
Check all the cooling lines to make sure they're not touching or rubbing on anything.
Good luck!
Last edited by citiboy; 05-06-2015 at 10:09 AM.
#95
05-06-2015, 02:36 PM
Here's what i did....
1. Loosen all the body mount bolts but don't remove it.
2. Remove the bolts (6x) on one side you want to start only, left or right side.
3. Jack the body on the side-middle with 4x4 block of wood just enough to place the spacers.
4. Insert the body lift spacers.
5. Install the bolts but do not tighten it yet.
6. Move to the other side and do the same procedure.
7. Torque all the bolts to 63 lb.ft.
Make sure to check the clearance of the fan shroud to the radiator fan. I don't have any issues on mine as i have the electric fan.
Check all the cooling lines to make sure they're not touching or rubbing on anything.
Good luck!
So you had no issues with trans linkage, i heard it is a cable, or gas filler hose...
I am gonna have to look into a electric fan, i know when i did my old 97 wrangler, i had to cut the shroud in the middle and splice a filler piece in...
Btw, i am looking at doing a 2 inch lift, like the owner of Big Black did, i am gonna have to look for longer bolts, and taller spacers, then the links that you mention, i am guessing 165mm instead of 140mm...
I really appreciate your help with the many questions i have asked
Thanks Eric
#96
05-06-2015, 04:22 PM
I have no issues in trans linkage and gas filler hose.
If you're going with the 2" body lift then you will have an issues in those parts. Just check everything while you lift the body.
I guess you need an inch longer bolt for your project. Maybe this https://www.fastenal.com/products/de...M12-1.75x170mm
Good luck!
If you're going with the 2" body lift then you will have an issues in those parts. Just check everything while you lift the body.
I guess you need an inch longer bolt for your project. Maybe this https://www.fastenal.com/products/de...M12-1.75x170mm
Good luck!

#99
05-07-2015, 09:54 AM
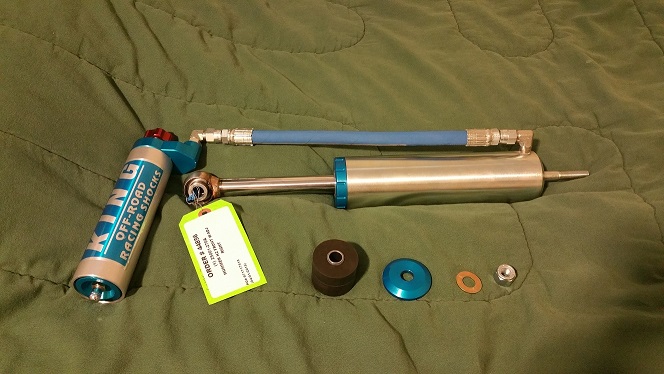
Finally got my front shocks in & installed.
These are the King Off-Road Racing OEM replacement kit w/ added adjuster.
Very nice so far, although the quality control through King is iffy. That's my only gripe. Don't charge $1100 for shocks with anodized parts if they will be shipped w/ nicks & scratches. Get your quality control on lock, please.
I'll have to test them out & see how the settings are. I took a short test drive and the softest setting is too soft, but that's not be expected.
Here's the shock as shipped. Notice that each side is labeled. Very nice touch. Such a huge upgrade over stock:
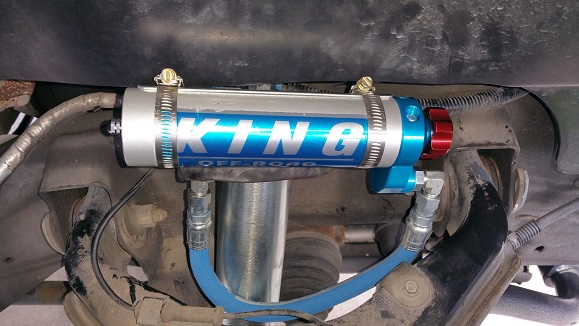
Here's the shock installed (passenger side):
These are the King Off-Road Racing OEM replacement kit w/ added adjuster.
Very nice so far, although the quality control through King is iffy. That's my only gripe. Don't charge $1100 for shocks with anodized parts if they will be shipped w/ nicks & scratches. Get your quality control on lock, please.
I'll have to test them out & see how the settings are. I took a short test drive and the softest setting is too soft, but that's not be expected.
Here's the shock as shipped. Notice that each side is labeled. Very nice touch. Such a huge upgrade over stock:
Here's the shock installed (passenger side):
#100
05-07-2015, 05:50 PM
I took out the bolt on the drivers side of the fan shroud that holds them together and the lower part rotates up into the top part. Didn't have to mess with anything else. I need to fab up some spacers for between the rear bumper and the body now tho.