When you click on links to various merchants on this site and make a purchase, this can result in this site earning a commission. Affiliate programs and affiliations include, but are not limited to, the eBay Partner Network.
Hummer H2For those who like a little more gleam to their Hummer, the H2 offers a similar rugged look as the H1, but as a lower cost, and with more added features, making it almost a massive luxury SUV.
Here are 2 possibilities off ebay, first one is from a Tacoma, 2nd is from a Tundra, I think the back part of the reflector would be a problem. 05-11 Tacoma Tundra
You can easily buy round LED lights on amazon for cheap which fill the hole plenty. Silicone the hell out of them since cheap lights will leak eventually. There are round LEDs on amazon with 4 mounting bosses on the back. Some threaded rod, a few washers and nuts and bam you have new LED DRLs without making brackets, templates, yadda yadda. I've done it for local owners years ago. My current set have been going strong for 4 years without issue.
Grind off the mounting boss and rattle can it black then do the threaded rods on the back through the factory holes. No hacking up the mounts or anything.
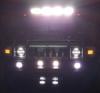
Thanks, they were sold out but I found the same product on another site. I received them yesterday and they really look like a nice match to the headlight. I plan on building a backing plate on my metal lathe and installing them. Hopefully the finished product will look as good as your.
Dan
The project moves ahead, I have scrapped the idea of using billet aluminum and used your approach of going with wood. I do have a couple of questions. I have included 2 pictures, the first is the rear of the block that mounts towards the bumper. You can see where I routed it out to allow the bulb to be installed and rotate. Unfortunately there is not enough room in install the connector to the bulb. My second picture is the finished spacer. I painted it with truck bed liner in an attempt to protect it from water.
Short of modifying the tabs on the bulb so I could plug it in or going to an LED or HID that plugs straight in I don't see any solution. I also took a close look at your final installation and it appears you installed a foam gasket to take up the extra space since the assembly sticks out further then the original.
I was wondering if you ever consider or tried the aftermarket metal bezels that go around the opening?
Thanks, Dan
I dont think he actually left the wood in there. I believe he just made that to use as a template to drill the plastic in the bumper to mount the new lights is all. That is likely also why you are having problems getting the plug to connect.
I dont think he actually left the wood in there. I believe he just made that to use as a template to drill the plastic in the bumper to mount the new lights is all. That is likely also why you are having problems getting the plug to connect.
Your probably right, but even if you did drill into the plastic bumper and mount them directly it looks as though the plug will still interfere with the lower stud that holds the lamp assembly in. I was looking at an LED replacement for an H10 bulb and it does not have an angled connector so that could work.
You know, looking at it again your right, if the wood donut was not used the only thing holding in the new light would be the three mounting point clips, the old mounting stud would not be used and that would allow for the full rotation and connection. But with that said I really didn't want to drill any extra holes in the plastic bumper. So, either I use the donut and put in a different bulb or drill the bumper, Humm,