
under $200 roof rack


Banned
Joined: Aug 2009
Posts: 2,652
if u zoom u can see the mid bolt difference.
thats why its not ez to slide this out the front till all nuts are loose.
it takes a little wiggling.
btw these ARE carriage bolts, not lag screws!.
it took me,(alone) about 30 min to install, then assm cross braces.
i beaks down to 5 pieces
thats why its not ez to slide this out the front till all nuts are loose.
it takes a little wiggling.
btw these ARE carriage bolts, not lag screws!.
it took me,(alone) about 30 min to install, then assm cross braces.
i beaks down to 5 pieces

Thread Starter
|
Member
Joined: Nov 2011
Posts: 77
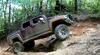
finally done with the rack. alls thats left is wiring the lights. the rack its self,and the lights was just under 200,,but by the time i add the paint and the wiring for the lights, it will still be under 300. Im satisfied.


Banned
Joined: Aug 2009
Posts: 2,652
with all the welding do you have some special rust treatment planned? id like to know what you use and how it works.
also,a close up of the final mounting bolt design. was it ez to put on?
im planning to work up a replacement for my 2x4 special using 2 inck aluminum angle stock but the same layout i have now.
im not a green guy but i sure like the look of your truck. looks army!
also,a close up of the final mounting bolt design. was it ez to put on?
im planning to work up a replacement for my 2x4 special using 2 inck aluminum angle stock but the same layout i have now.
im not a green guy but i sure like the look of your truck. looks army!
Thread Starter
|
Member
Joined: Nov 2011
Posts: 77
the only rust treatment I got is ALOT of primer and ALOT of paint. The paint that I used was duplicote <? bed liner stuff. It was the same stuff that I painted the grill with. I used 4 coats (4 cans) so I recon thats all of the prevenative maintenence that I can do. The mounts are made of 2X2 square stock. This gave me a good amount of room off of the roof, and with the 2X2, I could get a wrench in there to tighten up the bolts. The way that I attached to the inside of the track can be seen on tha first page, and heres how the attachment looks. It was very easy to put on, but I used an electric boom to raise it above the truck. The measurements was perfect and it fell right into place.
Thanks
jason

Thanks
jason
Last edited by mr.spooky; Mar 25, 2012 at 01:06 PM.


Thread
Thread Starter
Forum
Replies
Last Post
Caraddict
PRIVATE For Sale / Trade Classifieds
7
Apr 22, 2011 07:13 AM
FloridaFeMan
PRIVATE For Sale / Trade Classifieds
20
Feb 18, 2010 08:19 AM
waikoah
PRIVATE For Sale / Trade Classifieds
1
Aug 9, 2008 11:30 PM