Read If Your H3 Radiator Has Cracked or Leaked


#112
 07-06-2011, 08:15 PM

I'm not a car mechanic either, but I DO rebuild helicopters everyday for the government! I just want to highlight on a few areas and add to what you have already posted with a few pics and observations. I found the GM manual online, but it was so general that it was almost no help. It does however outline the process in general terms and list any special tools or steps that will be necessary. At first I was worried that I would have to pull the a/c and even recharge the system as well as pulling the fan (anyone have a 1 7/16" wrench?). The whole process is pretty simple and the grill doesn't even need to come out! All that you need is a small flat tip screwdriver, a 10mm, 13mm socket/ratchet and GM fan clutch wrench ( 1 7/16" open) if you decide to upgrade to an electric fan while it's all apart, a small pick and a pair of slip joint pliers. A 10mm GearWrench comes in VERY handy for the a/c core!!!
This is what it took to remove the radiator from my 2007 - I5. I am not a professional mechanic, but have been turning wrenches for 35 years. I took these notes while doing the work so I believe they are complete. Good Luck!
1 - Drop the skid plates. Self explanatory, remove the front two bolts and just loosen the back two.
2 - Using hose clamp pliers or channel locks, open and lock the hose clamp on the radiator side of the bottom radiator hose.
3 - Position your drain pan (a five gallon bucket will fit under the H3) and pull the hose off of the radiator. Let drain completely. I drained a little over a gallon out of the radiator, or about 2 radiator fluid jugs so you don't need a large bucket.
4 - Remove and plug radiator overflow hose and (trans?) vent line from right side of radiator.
5 - Remove radiator clamp from radiator side of top hose and pull hose off of the radiator.
6 - Go under the truck and tuck the radiator hose out of the way behind the sway bar.
7 - The fan shroud is two pieces - the larger main shroud which covers the entire radiator along with the top half of the fan but tapers to nothing at the bottom, and a bottom shroud which is wide at the bottom but only a thin ring at the top. Find the 3 equally spaced tabs on the rear portion of the shroud and spin them counterclockwise until the thin top portion is now on the bottom.
8 - From under the truck reach up between the radiator shroud and the engine and remove the small screw (1/4�) and the plastic crescent-shaped shroud retainer from each side of the shroud. I don't remember a screw on mine, just the retainer clips on the sides of the radiator. Use a small flat tip screwdriver to unclip them if you have fat fingers like me.
9 - Push up on the bottom shroud to clear the lip of the full shroud and then pull back. The bottom shroud will come free. It cannot be removed as it fully rings the fan but it can be pulled back over the fan and out of the way If you rotated the rear shroud counterclockwise you will have room to lift the entire shroud up and off the fan, I did this after having removed the bolts holding the radiator in place so that I could have a little more maneuvering room.
10 - Pull back on the two black plastic retainer rings covering the transmission to radiator couplings. This will expose the wire retainers which hold the trans lines in. Using a dental-type pick or small needle nose pliers pull the wire retainers off (the new radiator should come with new ones). You can now pull the trans lines back and free from the radiator. Plug them as they will leak. Be careful with the two plastic retainers, they are a reusable safety retention cap over the tranny fluid line clips. If they break go buy new ones or try large zip ties over the clips to hold them in place if you are cheap. Pull the clip off one side of the line at a time and not straight off, you may need to work it out of the detents with the pick or small flat tip screwdriver.
11 - Remove the grille. There are four bolts in the top and two which you have to reach through the grille with a socket to remove. The grille is retained by clips at the ends both above and below the marker lights. Grasp the grille above and below the marker light and gently rock the grille top to bottom to work them out. Take your time or you will break them. Totally not necessary, use a 10mm GearWrench on the a/c core bolts once the radiator is loose and pivot back slightly if needed. See step 13.
12 - Remove the radiator top mount at the center of the core support.
13 - Through the grille opening remove the 10mm bolt on the driver�s side which holds the A/C condenser to the radiator
14 - Tilt the radiator back slightly and remove the 10mm bolt holding the top of the condenser to the radiator on the passenger side. You have to reach between the radiator and the core support. It�s tight but doable.
15 - Reach through the grill opening and lift the condenser slightly to disengage its tabs from the two retaining slots at the bottom of the radiator. Pull it forward slightly into the core support opening. I zip tied mine in place as it can flop around when removing and installing the radiator.
16 - You can now remove the radiator. It will not pull straight up. You will need to pull it up an inch to free its from its lower anchor points and then move it slightly towards the passenger side to clear the AC line. Once clear of the AC line it will pull straight up and out.
17 - Clean and transfer all part to the new radiator including the little nuts on the sides that are used to bolt the condenser to the radiator. Don't forget the two clips for the tranny lines at the bottom of the radiator or the push in clip on the upper right side that the "trans breather line" was in.
18 - Reassemble in reverse order. When hooking the trans lines back up you should hear a (slight) click from the wire retainers dropping into their slots when you have pushed the lines into the radiator far enough. These clips do not click straight on, push one side into the hole first and then the other side in a rolling motion, they are not made to be bent open as far as when you click it on straight down. Push the 2 black retainers back over the clips, they will have to be indexed to line up with the clips to go on all the way. Do not leave these off, they hold the clips in place and without clips you could loose all your transmission fluid when you most need it! They have to go on evenly all the way around and not be split. It will be helpful to put the a/c core into the slots before bolting it onto the radiator and/or pivoting the radiator into place.
19 - Refill with fluids. Do not put the skid plates back on until after you have run the vehicle and checked for leaks. Depending on your particular replacement radiator, it may be necessary to tighten up the transmmission line's jamnuts going in to the radiator.
#113
07-06-2011, 08:37 PM
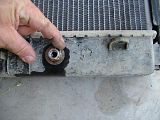
New Radiator (differed only in that the two nuts on the top sides are not clipped in but have a friction fit in a recess and the mounts for the transmission line clips seemed slightly thicker).
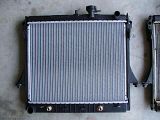
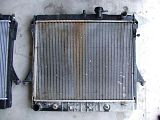
Old Radiator
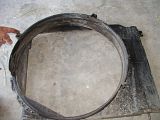
Save these items
Roll clip in from side
This Tab rotates around
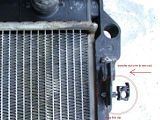
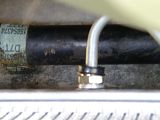
View of L/H A-C bolt through grill
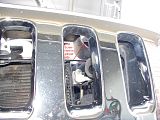
Look, only radiator has to come out!
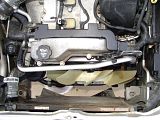

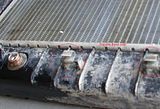
These two pictures show incorrectly installed retainers, cracked or unevenly seated is bad.
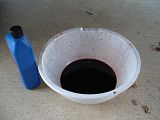
This is all the fluid that came out, about 1/2 qt. I added 3/4 qt to brink it back to the middle on HOT.

Old Radiator


Save these items

Roll clip in from side

This Tab rotates around

View of L/H A-C bolt through grill

Look, only radiator has to come out!


These two pictures show incorrectly installed retainers, cracked or unevenly seated is bad.

This is all the fluid that came out, about 1/2 qt. I added 3/4 qt to brink it back to the middle on HOT.

Last edited by rsc; 07-07-2011 at 09:03 PM. Reason: add words to the pictures.
#114
07-27-2011, 02:55 AM

Not different on the outside but they are on the inside. I went all through this several pages back. Your aftermarket trans cooler is about half the size of the stock one and made of thinner material. Make sure you use the additive to protect the innards from the DexCool.
#115
07-27-2011, 03:01 AM
Okay so I tried, and cannot find a crack in my radiator anywhere.... I called up Hummer customer support and got no where, since Iit doesn't have a recall notice." but they said if I take it to a dealership and get it diagnosed they "might" be able to work something out. So Then I called a few local GM dealerships and found out a diagnosis is gonna be around 125 bucks. they all basically told me that its the dealerships choice to do a courtesy repair and that the chances of me getting a courtesy repair or whatever its called are slim to none, since I bought my Hummer used.... SO, now I think I'm going to just find a radiator repair shop and just get it fixed. Does anyone know how much that's gonna cost? or have an alternative idea?
#116
07-28-2011, 11:54 PM

--------------------------------------------------------------------------------
Sorry folks - I've neglected this forum, Had intense real life issues over rode surfing our groups. But from the surprise in the Hummer Zones voice it seemed that ours was suppose to be a rare instance . . . (Sort of like our engine blowing to bits a couple months earlier)
All I can say is 'Oh My' I guess our case was not as unique as as the Hummer Zone officer told us! As I read the page after pages of the same issue!!
The pics posted by others (better than I would have done) yep show the issue very well!
By the way to Tricia - When I talked to the Zone manager (as I understand different in different parts of the country) After arguing with the dealer and finally getting the number, I did get a case number - gave all the personal info - gave the VIN number - It got us NOTHING! Never a follow up, not a call or a note. Not even a polite thank you for a good time and taking $803 of our hard earned money!
And as we had only 12 hours to get it together and on the road for a weeks long road trip, we were at mercy / or lack of, from our local dealer . . . And pressured into paying through the nose!
Watching the new radiator - and it's already repeating of the original wear pattern! (so we do not think it was just one bad batch of radiators) We hope to also figure a way to maintain our wimpy little plastic radiator in a better no-stress / free floating configuration!
I'm just glad to see that this has allowed others to approach issue with a little back up that this is not a "rare instance"
Keep squeaking and maybe we'll see a change - (hah from a company no longer in business with nothing to lose . . .)
My husband had said that posting this originally probably would not do any good but I feel if it prepared even one other person for this battle then - Hurray!
Must admit . . .First time in 40 years we do not own a Jeep - Husband is feeling extreme regrets - all because we wanted a US made work utility vehicle with a 5 speed - sighs . . . . First blown engine - first radiator shot to heck - and it doesn't even have first 100K . . .We have never sold our used Jeeps before 240K and never had such issues with a one of them! . . .(just worn out plastic bits)
Heaven help us when this gets just a bit older!!
Now on to fix our little 'ignition lock out' issue haha
Like earlier post said - when it runs it's great - when broke it's junk . .
#117
08-08-2011, 03:40 AM

I think a class action suit is in order here!
I had a problem with a design flaw in my Ford Tempo. The electronic nodule attached to the distributor would develop a crack and short out. I just had the part replaced for $400 and forgot about it until one day I saw a class action suit in a magazine for this very same part. I sent a copy of my receipt to the lawyers office and never thought I would ever hear from them. About 6 months later I received a check for $400.
This is obviously a design flaw and GM should be responsible.
Any lawyers here?

#119
08-12-2011, 01:04 AM
I just checked my 2006 H3, peeled back the foam strip and there seemed to be plenty room between the radiator top plastic cap and that metal flange.
There were no marks at all on the radiator top tank.
You would think they were all made the same?
There were no marks at all on the radiator top tank.
You would think they were all made the same?
#120
08-13-2011, 01:54 PM

Interesting. I have smelld coolant since the day I purchased my 08' H3 in Jamuary 08'. Have had it in the shop 4 times to check for leaks...nada. Had the cylinder head replaced last week under warranty as the engine hesitated at times on start-up. Got home and smelled coolant. Popped the hood and the top of the radiator was spewing coolant. Drove it right back and as soon as I mentioned it had a coolant leak the service writer said they would order a new radiator...without even looking at it. AMAZING!