When you click on links to various merchants on this site and make a purchase, this can result in this site earning a commission. Affiliate programs and affiliations include, but are not limited to, the eBay Partner Network.
Installing the Gentex GENFDM3LN Rear-view Mirror Camera
Hummer H2For those who like a little more gleam to their Hummer, the H2 offers a similar rugged look as the H1, but as a lower cost, and with more added features, making it almost a massive luxury SUV.
Installing the Gentex GENFDM3LN Rear-view Mirror Camera
I thought I would provide a couple posts on installing the Gentex rear-view mirror camera which helps fix the challenge of rear visibility from the Hummer H2. There are a couple rear view options, including the OEM camera option built into the rear bumper, but all have their issues. After experiencing the rear-view mirror camera that Cadillac began introducing back in 2016, I was looking for an option that would bring that to the Hummer H2, and this is the aftermarket version direct from the OEM manufacturer.
What is it?
Replace your Hummer OEM mirror with this Gentex mirror that connects to a rear-facing camera so you get a wide unobstructed view of your rear
Comes with a rear camera that is mounted to the interior rear glass
You can still use your OEM camera with navigation, or aftermarket solution and get two views of your rear
What is it not?
Though it is Gentex, and the Hummer rear view mirror is made by Gentex, it does not use the connector on the rear view mirror harness... so it is not plug and play. You have to run new wires.
You lose any of the readouts that were available on your Hummer mirror like temperature or compass as this mirror does not connect to the OEM wire harness
If you had the OEM camera video routed to your OEM rear-view mirror... you lose that video and would need to reroute that to your navigation system if you wanted to keep it
What does it look like?
When it is off, it looks like a standard OEM mirror. In fact, you can keep it off and use it like a mirror
When it is on, the entire face becomes a video feed of the rear-facing camera
** These are instructions for the Hummer H2 2008/2009... but other model years will be pretty close.
Step 1 - Remove the OEM mirror
Disconnect the rear-view mirror wire harness on the back - typically a 16 pin black connector
Loosen the screw (should be a T20 Torx) on the mirror base that holds it to the windshield mount
Slide up and remove
Save the wire harness cover that snaps into the top... since it was made by Gentex, it snaps right into the new mirror
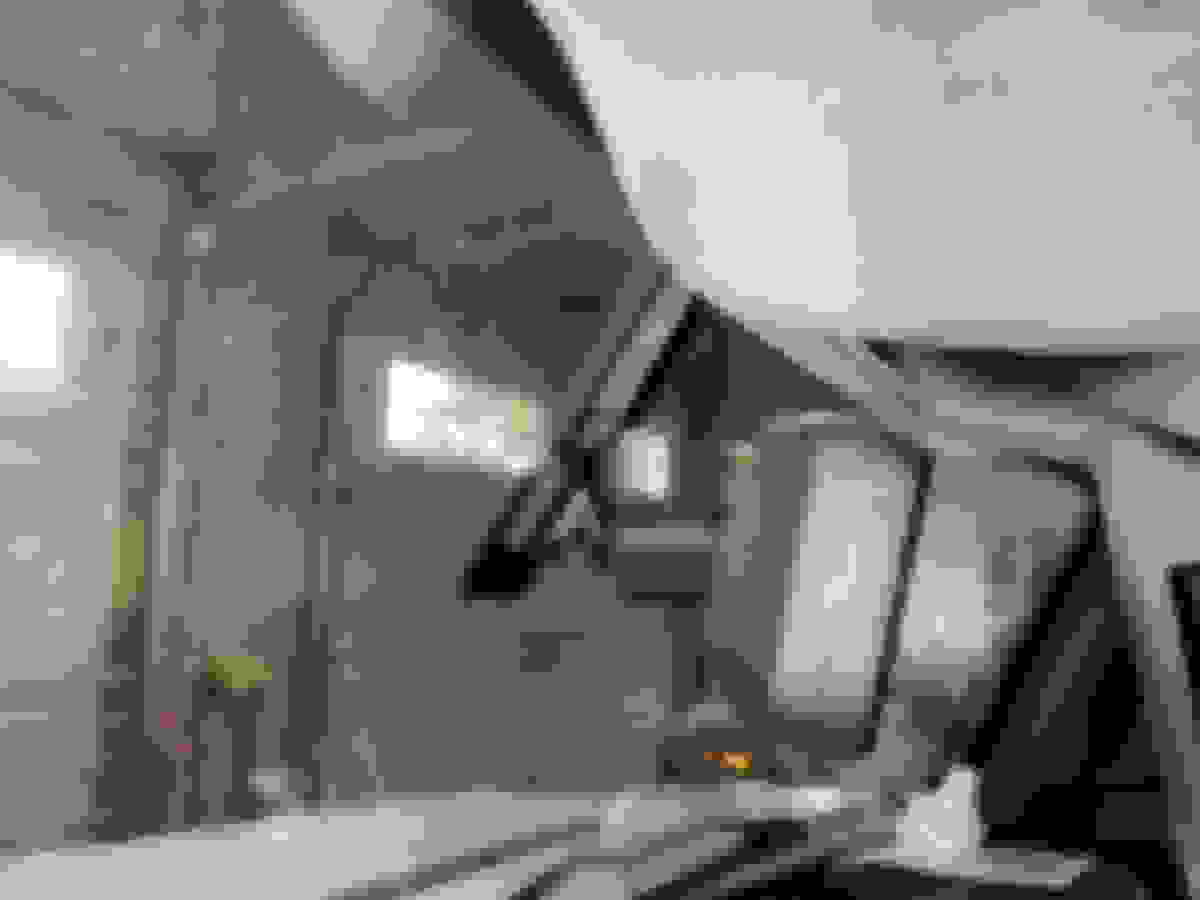
Step 2 - Remove the overhead console with map lights.
Carefully pop the plastic cover that is over the map lights - a small screw driver should work
Under that you will see the two screws that connect the console to the headliner. Remove those.
That will loosen up the front.
Then the rear is held in place with two clips. Pull those gently down and out.
The overhead console will then be held in place by its wire harness. It is strong enough to support the weight while the next few steps are done.
Step 3 - Pull the OEM rear mirror wire harness back into the headliner
The new mirror does not use the OEM harness. Pull that through the notch at the top center of the headliner.
The headliner will flex enough to pull the large connecter through if you are gentle. You don't want to loosen the headliner.
The wire harness is glued to the headliner, but there is enough room, to pull it back. I wrapped mine up with felt wire wrap and connected it to another wire harness with wire ties to eliminate future rattles.
If it was a plain jane mirror, you won't need that wire harness any longer and can forget about that connector.
If it had video, then you probably need to route that video down to your Navigation system. This is the easiest place to access those wires. But that will be for another post.
Step 4 - Install the new Gentex Mirror
The GENFDM3LN has a mount that fits the hummer windshield mount perfectly.
Slide it down and tighten the Torx screw - firm but not tight
Unlike the OEM mirror that just has a male connector, this mirror has two pigtails. One connects to power, the other to the coax video feed from the camera.
Push those pigtails up through the notch in the headliner
Replace the wire harness cover
View from the driver side
View from the passenger side - I routed the wires to this side
Step 5 - Connect the wiring to the Mirror
If you are using one camera with the mirror, then the mirror only requires three wires: 2 Switched Power + 1 Ground. Technically those are in the standard OEM wire harness that was just tucked away. I looked for some sort of pigtail that would plug into that OEM 16 pin wire harness and then connect to the mirror pigtail to no avail. If you can find a MALE 16 pin connector that fits that female connector on the wire harness, it could save a step... I was not willing to cut that wire harness up to get to the power and ground, which would save one wire pull. Why as the OEM manufacturer they don't sell that, I don't know.
So they provide a three wire harness to pull and connect to the white connector pigtail. And, they provide the coax to pull to the coax pigtail.
There is an option to run a second camera to the mirror as Picture in Picture, which would require another cable pull. I did not use that feature.
First, I poked the provided wiring harness into a gap in the headliner above the drivers side and poked the wiring towards the overhead console.
Second, I connected the wiring to the two mirror pigtails
Third, I made sure the wiring has some play, and wrapped and secured them to prevent rattles
@calif phil - Price is very similar to the cost to replace the OEM rear view mirror with video. Crutchfield has it for $849 and Amazon has it for $829.
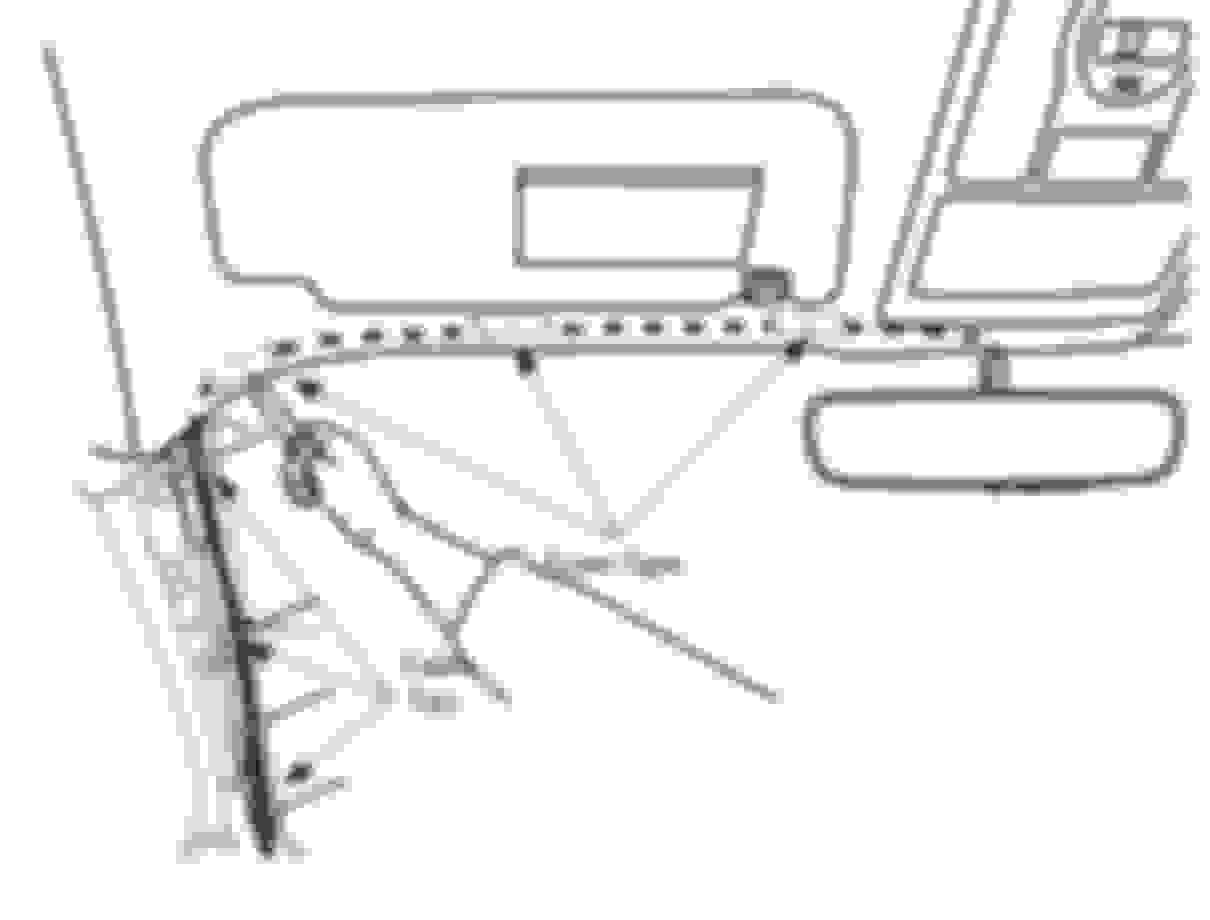
Step 6 - Running the wires down the A pillar - the diagram the manufacturer provides is pretty accurate...
First, remove the fuse panel cover from the left side of the dash - this is where you will pull the wires to.
Then, remove the trim from the driver's side A Pillar. It is held on with 2 bolts. Wires will come through here.
Push the wires into the gap at the front edge of the headliner, and around the top left corner... there is room.
In my H2, there were two plastic channels for wire harnesses, and only one in use. I placed the mirror cables into a small 1/4 inch plastic wire loom and wire tied those to the black plastic channel guides. I think that other channel was for the OEM light bar that was an option - just guessing.
Replace the A pillar trim and two bolts
Run the wires down through the fuse box opening and back towards the I/P junction box right begin the brake pedal.
Rubber grip comes right out of the handle Two bolts to remove Wire running down the A pillar Wire ready to test
Step 7 - Test the Mirror with temporary power - Do this at your own risk - high voltage danger - I have no responsibility if you fry something! Pin values should be good for the 2008/2009, but need to be evaluated for other models.
Plug the camera into the coax. I actually connected the full length of Coax, and taped the camera to the rear window for the first test. NOW... disconnecting these coax connectors is a pain... but they do disconnect. They cables use FAKRA coax connectors which are difficult to disconnect.
Disconnect the Battery.
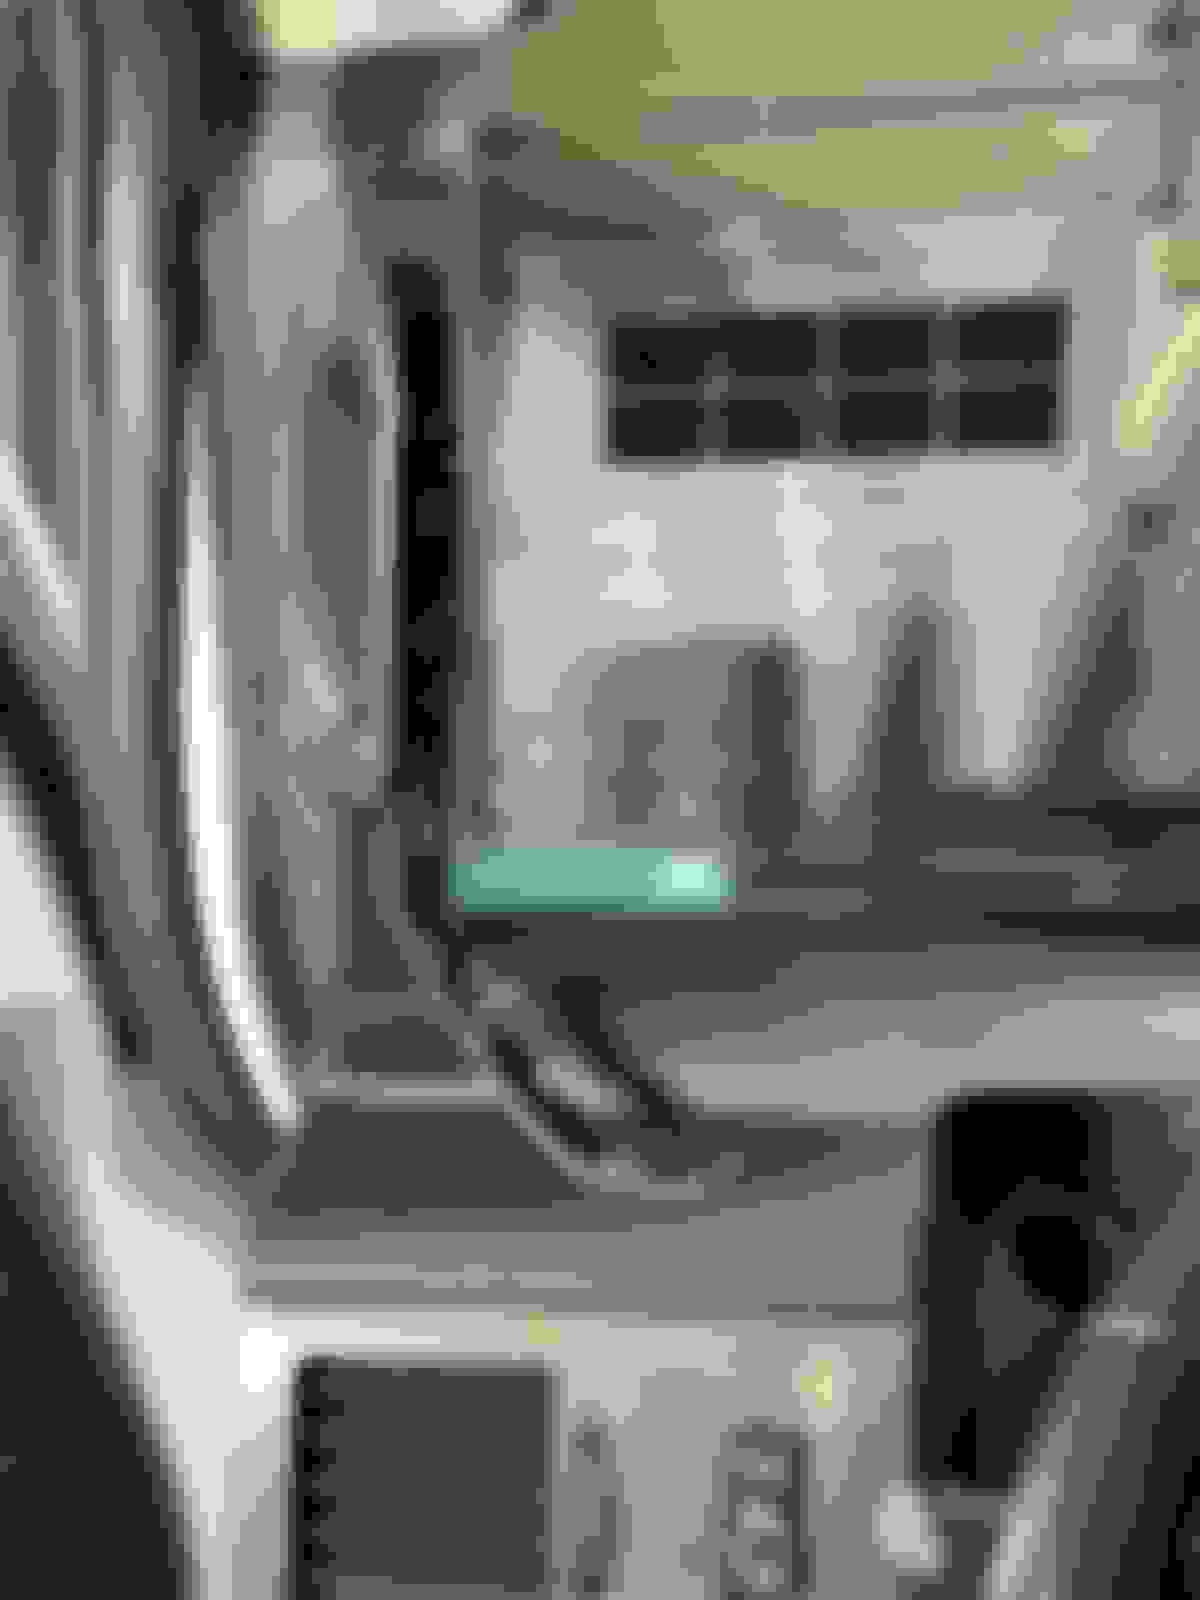
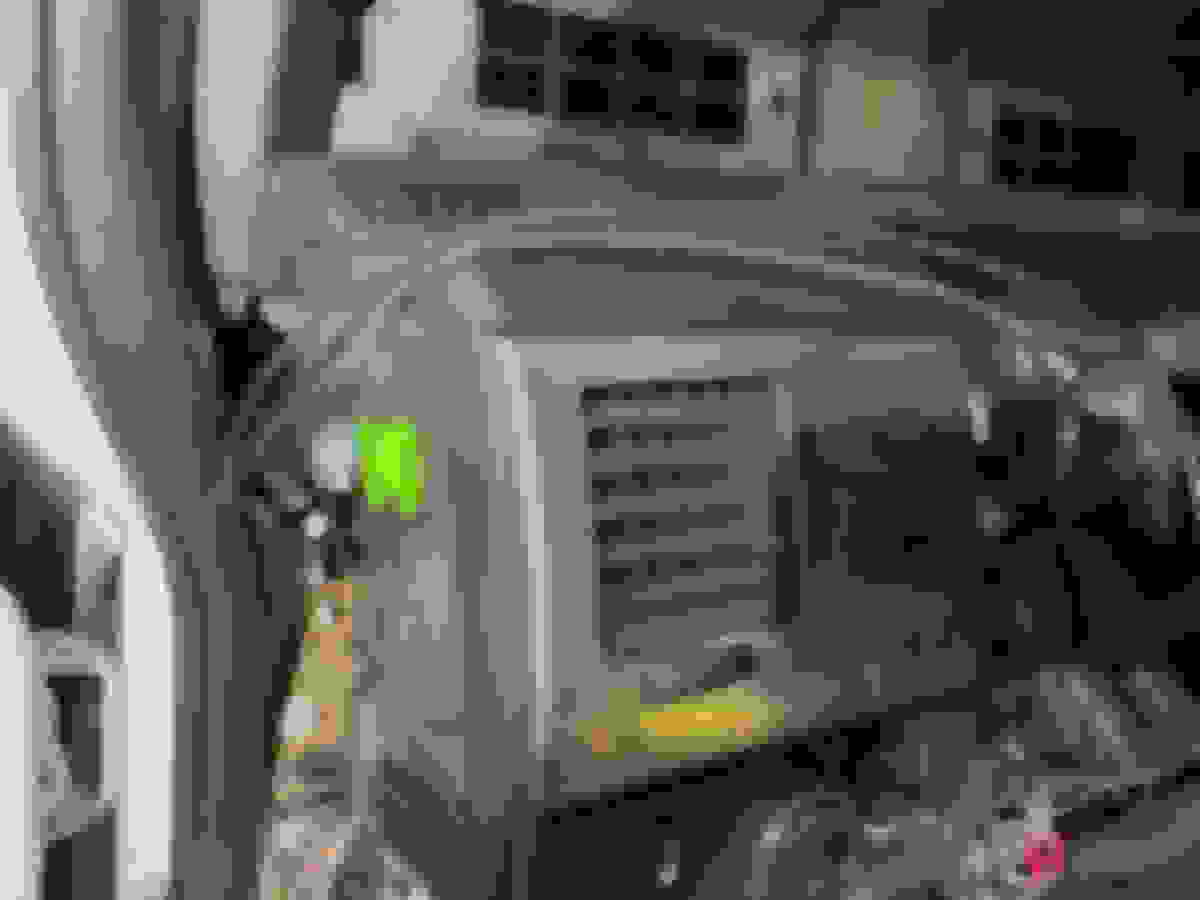
Locate the junction box between the parking brake and the brake pedal, pull the plastic cover off from the top. Here is were power is distributed for inside the vehicle.
When you pop off the cover, you will see 10 connectors, with two populated on the left bank, and three populated on the right.
The left bank, fourth connector down is empty and has 6 pins. This junction box is the same as used in the Silverado trucks. In the Silverado manual this is connector X14. From what I can tell, top left pin 7 should be Ignition Power. Bottom left pin 8 should be Accessory Power. Connect both power wires to a wire with a fuse (2A or 5A) with a connector on the end for a fast test - I cut the fuse out of an old accessory to do a fast test. I connected to pin 7 for the quick test.
I connected the ground wire to a screw near the fuse box just for a fast test.
Reconnect the Battery
Turn the key, and the mirror should power up and show an image - now you know it works
Once you know you are in business, disconnect so that we can get proper wiring to power and ground.
These are pins 7 and 8 on the X14 connector
This is what it looks like when you pull the cover off
Here is a close up with my test wire connected to pin 7
And here is what the camera looked like OFF then ON... magic. No rear tire blocking the view. Wider angle - I placed a step stool where another car would be in my blind spot... I can see it.
Next post... gotta pull the wire to the rear and properly connect power.
@finall Yes, the other option is a camera placed higher on the rear + a LockPick to support another camera input with a Video in Motion override... but this solution makes it all feel OEM.
I really tried to find the camera that replaces the center rear tailgate clearance light... but I searched and searched and could not find it... it was a good idea... may try to 3D print one... product was called H2BUPKG for Hummer H2 Vehicles by QualityMotorVehicles... guessing not enough demand... I am not exactly sure how they ran the coax from the camera in the tailgate to the body. I have looked at that flexible wire harness that connects all the tailgate electrical to the body, and I cannot see a way to fish another wire through there. For the Gentex install, my wire is fished directly into the top trim with a drilled hole, which is not ideal.
Mine was similar, but made by a different company. My was called HCam. It stopped being made a decade ago, and the California company closed its doors.
You could get an overboard for the stock deck, and play the camera thru the infotainment screen.
No extra goofy screen required. Mine still works well.
It does NOT use a coax, just a thin wire.
See if you can find a used one online somewhere. I think I paid about $1500 for it back in 2007, including install.