
Upgrading my head unit


Thread Starter
|
Member
Joined: Dec 2012
Posts: 55
Hey everyone, I have decided to upgrade my head unit in my 2006 H3. This is a learning experience for me, as I haven't done this before. I'll make sure to take some pics and see if I can put together a concise record of events to help those in my position.
*note: These images are pretty big, and I'm not uploading and resizing multiple copies. Instead, I'm doing a direct hotlink resized on the fly with html tags. I'll drop an anchor tag around the images so you can open them in a new window, should you feel so inclined.
**note2: For the life of me, I can't get the form to accept html input...so I'm just dropping the huge images in here directly with a link, and they're just going to be big...sorry guys.
Before:

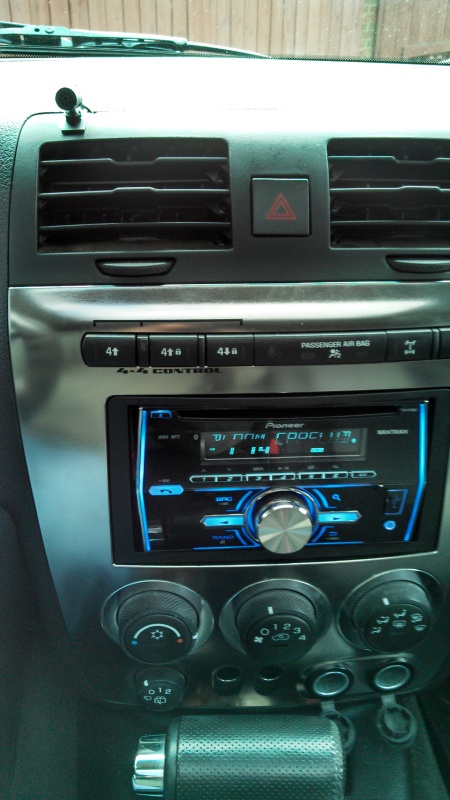
After (poor lighting, had to use the flash):

When I posted this I had the following questions:
Finally, vehicle and unit specifications:
Vehicle: 2006 HUMMER H3 BASE
Sound system: Standard (non-Monsoon)
Vendor: Crutchfield Vendor satisfaction: Excellent
Upgrade unit: Pioneer AVH-P3400BH DVD receiver
Integration adapter: Metra GMOS-01
Let me begin by saying, for someone who has had next to no experience working on cars, or with wiring, I found this to be a pretty easy procedure. Best Buy wanted to charge $120 for this install. Save your money, and install it yourself.
Purchasing from Crutchfield, they included a free mounting bracket, and antenna adapter. I had to purchase the wiring harness. (I've already hotlinked two huge images, so I'll just drop a link here for anyone who would like to see what came in the box.) http://imageshack.us/a/img600/3401/20130319180754.jpg
In order to drop the unit in, you need to connect the wires. I was a little nervous about this part, but the harness came with very simple instructions.
From the 16-pin harness:
First, I disconnected the negative battery terminal.
Second, with my palm facing upwards, I stuck my fingers into the 12v accessory plugs and pulled straight back until it popped out.
Here's an image of the accessory plugs.
Here's a side view after it first comes out.
After the bottom comes out, work your way up the sides until the entire plate surrounding the radio, up to and including the central vents, comes out.
The plugs were tricky. Both of the accessory plugs had a connector behind them, as did the 3 climate control switches, and the rear windshield wiper controls. Up at the top the hazard switch, and the 4wd controls also have connectors. I ended up leaving the 4wd controls connected, and just let the cover sit on top of the dashboard.
Once you have the cover off, or in my case just out of the way, there are 4 10mm hex bolts holding your radio in place. Take them off, and your radio slides straight out. The back of your radio has 2 connectors, and an antenna. They come apart pretty easily.
This is what it looks like after you take the radio out
If you purchased from crutchfield, attach your unit to the mounting bracket they supplied. Your aftermarket harness connects directly to the two connectors you pulled out of the radio, and the antenna connects to the adapter. Attach the antenna adapter to the aftermarket radio, plug the microphone into the back of the unit, and connect the unit to the harness. After that it literally just slides in where the old radio was.
Reconnect the negative terminal, and make sure your radio works. Assuming it does, tighten your bolts and reconnect everything you you disconnected on the faceplate. The faceplate simply snaps back into place.
With regard to the microphone, I elected to just have the wire come out from between the vents and run across my dashboard. As a result, I have a wire visibly running across the dashboard. Some might think it's ugly, but it suits my needs.
For those who are curious about the packaging, or the contents supplied from crutchfield, here is a collection of images showing everything that was included.
Everything in the main package
Closer shot of the radio package
Crutchfield supplied mounting bracket
Antenna adapter
Aftermarket wiring harness
Promotional catalog
Everything inside of the radio package
Radio wiring harness
Microphone, clamp, and mounting screws
Owners manuals
Warranty
Remote control and frame
Unit front
Unit rear
Everything inside the aftermarket wiring harness
Harness component
I hope this has been helpful. If something was unclear, or you have questions, or if you have any suggestions for improvements, let me know.
Thanks,
-qui
*note: These images are pretty big, and I'm not uploading and resizing multiple copies. Instead, I'm doing a direct hotlink resized on the fly with html tags. I'll drop an anchor tag around the images so you can open them in a new window, should you feel so inclined.
**note2: For the life of me, I can't get the form to accept html input...so I'm just dropping the huge images in here directly with a link, and they're just going to be big...sorry guys.
Before:

After (poor lighting, had to use the flash):
When I posted this I had the following questions:
- Is there any special trick to get the main panel (the one that surrounds my current stereo and climate controls) off? I don't see any screws...
Turns out, no. It is surprisingly easy to remove it. Just as it was suggested, I grabbed the inside of the accessory plugs and pulled straight back. - Apparently, I'm going to need to route a microphone from the back of the unit to somewhere by the mirror? Does anyone have any experience with this? I was thinking I would run it behind the gauge cluster and up the frame behind the tweeter. Which brings up another panel question...
- Is there a detailed resource that walks through removing the panels? I've checked the Owners Manual and the Wiring Diagram, but I didn't see anything on there about panel removal. I've read about them just coming out, but I'm a bit apprehensive about tugging on these pieces.
The vendor I used (crutchfield) included instructions. They appear to sell the instructions as well, but they include them with your purchase. I ended up not taking the panels off though.
Finally, vehicle and unit specifications:
Vehicle: 2006 HUMMER H3 BASE
Sound system: Standard (non-Monsoon)
Vendor: Crutchfield Vendor satisfaction: Excellent
Upgrade unit: Pioneer AVH-P3400BH DVD receiver
Integration adapter: Metra GMOS-01
Let me begin by saying, for someone who has had next to no experience working on cars, or with wiring, I found this to be a pretty easy procedure. Best Buy wanted to charge $120 for this install. Save your money, and install it yourself.
Purchasing from Crutchfield, they included a free mounting bracket, and antenna adapter. I had to purchase the wiring harness. (I've already hotlinked two huge images, so I'll just drop a link here for anyone who would like to see what came in the box.) http://imageshack.us/a/img600/3401/20130319180754.jpg
In order to drop the unit in, you need to connect the wires. I was a little nervous about this part, but the harness came with very simple instructions.
From the 16-pin harness:
- Connect the red wire (there are two of them, either one will work apparently) to the ignition wire of the aftermarket radio(AR)
- Connect the Orange/white wire to the illumination wire of the AR. If the AR doesn't have one, just tape it off.
- Connect the white wire to the left front positive speaker output of AR
- Connect the white/black to the left front negative speaker output of AR
- Connect the Gray wire to the right front positive speaker output of AR
- Connect the Gray/black wire to the right front negative speaker output of AR
- Connect the Brown wire to the mute wire of AR. If AR does not have, tape off.
- Connect the Light Green wire to the parking brake wire of the AR.
- Connect the Blue/Pink wire to VSS or speed sense wire of AR
- Connect the Green/Purple wire to the reverse wire of the AR
- Connect the Yellow wire to the radio 12v wire or battery memory wire
- Connect the Black wire to the ground
- Connect Blue/white to antenna turn on for AR
- Connect the Green wire to the rear left positive speaker output of AR
- Connect the Green/black wire to the rear left negative speaker output of AR
- Connect the Purple wire to the rear right positive speaker output of AR
- Connect the Purple/Black wire to the rear right negative speaker output of AR
First, I disconnected the negative battery terminal.
Second, with my palm facing upwards, I stuck my fingers into the 12v accessory plugs and pulled straight back until it popped out.
Here's an image of the accessory plugs.
Here's a side view after it first comes out.
After the bottom comes out, work your way up the sides until the entire plate surrounding the radio, up to and including the central vents, comes out.
The plugs were tricky. Both of the accessory plugs had a connector behind them, as did the 3 climate control switches, and the rear windshield wiper controls. Up at the top the hazard switch, and the 4wd controls also have connectors. I ended up leaving the 4wd controls connected, and just let the cover sit on top of the dashboard.
Once you have the cover off, or in my case just out of the way, there are 4 10mm hex bolts holding your radio in place. Take them off, and your radio slides straight out. The back of your radio has 2 connectors, and an antenna. They come apart pretty easily.
This is what it looks like after you take the radio out
If you purchased from crutchfield, attach your unit to the mounting bracket they supplied. Your aftermarket harness connects directly to the two connectors you pulled out of the radio, and the antenna connects to the adapter. Attach the antenna adapter to the aftermarket radio, plug the microphone into the back of the unit, and connect the unit to the harness. After that it literally just slides in where the old radio was.
Reconnect the negative terminal, and make sure your radio works. Assuming it does, tighten your bolts and reconnect everything you you disconnected on the faceplate. The faceplate simply snaps back into place.
With regard to the microphone, I elected to just have the wire come out from between the vents and run across my dashboard. As a result, I have a wire visibly running across the dashboard. Some might think it's ugly, but it suits my needs.
For those who are curious about the packaging, or the contents supplied from crutchfield, here is a collection of images showing everything that was included.
Everything in the main package
Closer shot of the radio package
Crutchfield supplied mounting bracket
Antenna adapter
Aftermarket wiring harness
Promotional catalog
Everything inside of the radio package
Radio wiring harness
Microphone, clamp, and mounting screws
Owners manuals
Warranty
Remote control and frame
Unit front
Unit rear
Everything inside the aftermarket wiring harness
Harness component
I hope this has been helpful. If something was unclear, or you have questions, or if you have any suggestions for improvements, let me know.
Thanks,
-qui
Last edited by qui; Mar 21, 2013 at 06:34 PM. Reason: update

Senior Member
Joined: Aug 2007
Posts: 997
From: Reno, NV
I can get you this far . . .
If you are speaking of the brushed aluminum cover. It is held in place by spring clips (only)
You must pull it straight out from the bottom first.
Put your fingers into the two holes which are the two charging ports at the bottom.
This gives you some where to grab. NO screwdriver around the edges !!!
Pull straight out and the bottom spring clips will detach.
Then grab both sides of the now loose cover and again pull straight back and the other clips
will detach. Be careful of the wiring harnesses attached to the cover.
They must be disconnected in order to entirely remove the cover.
Once it is removed, you will see the stereo unit
Good luck
Thread Starter
|
Member
Joined: Dec 2012
Posts: 55
...
You must pull it straight out from the bottom first.
Put your fingers into the two holes which are the two charging ports at the bottom.
This gives you some where to grab. NO screwdriver around the edges !!!
Pull straight out and the bottom spring clips will detach.
You must pull it straight out from the bottom first.
Put your fingers into the two holes which are the two charging ports at the bottom.
This gives you some where to grab. NO screwdriver around the edges !!!
Pull straight out and the bottom spring clips will detach.
wfturner,
Thank you for your input. Just to make sure I'm clear, I'm not loosening anything. I'm literally just grabbing it and yanking it out?
Thanks
-qui
I also did new speakers all around and a backup camera while I was at it. I highly recommend the backup camera as it helps with the H3's notorious "blind spots" while backing up, easy to do and you can find a good one online for under 20 bucks. Just my 2 cents...


I routed my mic cable behind the gauge cluster, up the driver's side "A" pillar and glued it on right at the top, where the oil change sticker on the windshield usually goes, it's barely noticeable and I'm heard clearly.