
P0128 - Thermostat or Coolant sensor?


Senior Member
Joined: Oct 2011
Posts: 1,655
From: Wisconsin
Yes sir, understood.
Unfortunately, as the thread title implies, the truck is throwing a P0128 code and thereby, will not pass state inspection. Minimally, it is required that the thermostat be replaced, quite possibly the coolant sensor as well. But, I too subscribe to that old wisdom you speak of, but with a twist, "If it ain't broken, don't break it."
Modern cars sometimes need to be fixed when they ain't broken.
Now see,
If I'd read more closely I'd of noticed you placed po128 in the title. The easiest thing then is to start with the temp sensor and then the t-stat.
I've actually done both on my 07 H3. The temp sensor is in a goofy tight space so I cut out the side of a 5/8" spark plug socket as to facilitate easier replacement.

Thread Starter
|
Junior Member
Joined: May 2015
Posts: 26
From: New York, NY
Did the t-stat about 2 weeks ago and the code has not returned.
It was a little bit of a hassle trying to complete the drive cycle, waiting for the readiness monitors to complete. The last 2 hanging up were the evap and the O2. I managed to get the O2 to go ready by racing up and down the highway for about 8 miles or so. The evap was still not ready when I went thru inspection but you are allowed ONE monitor to be incomplete.
So, it PASSED.
Thanks all for your help, much appreciated.


Senior Member
Joined: Jul 2012
Posts: 9,003
From: C-Town
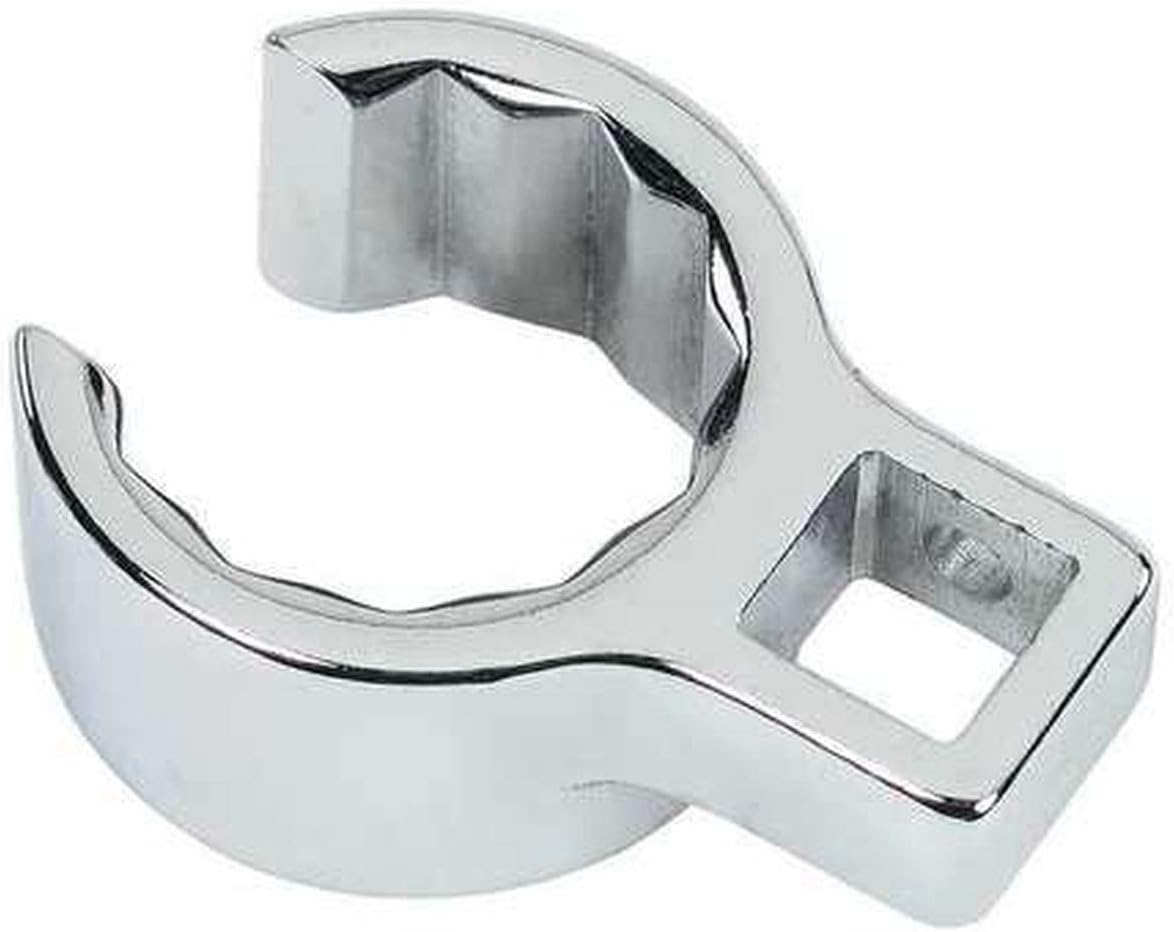
Some mods required, remove the exhaust manifold, remove the heater core coolant line, cut a hole in the firewall, chop the head, then that crows foot should fit?
Last edited by hummerz; Jun 4, 2021 at 05:22 PM.

Member
Joined: May 2010
Posts: 31
From: Georgia
Replaced the thermostat yesterday with the AC Delco 1511073 195 degree. It was a pain in the *** but got r done. Glad I checked this forum before hand as my H3 runs hotter than it previously did. Now a little above the middle line on the dummy gauge. Read were others experienced the same thing some GM changed the stat. I would have been freaked out if I didn�t read about it here. PS, ditched those stupid damn spring clips in favor of the old style screw clamps. Thanks for all the knowledgeable folks on this forum!
Senior Member
Joined: Jul 2012
Posts: 9,003
From: C-Town
Replaced the thermostat yesterday with the AC Delco 1511073 195 degree. It was a pain in the *** but got r done. Glad I checked this forum before hand as my H3 runs hotter than it previously did. Now a little above the middle line on the dummy gauge. Read were others experienced the same thing some GM changed the stat. I would have been freaked out if I didn’t read about it here. PS, ditched those stupid damn spring clips in favor of the old style screw clamps. Thanks for all the knowledgeable folks on this forum!
Member
Joined: May 2010
Posts: 31
From: Georgia
just a few scratches here and there and a bruised left hand but not too bad. I do have a question though. I don�t think there�s any bleeder valves so do I just take the cap off the radiator and run it till it�s warmed up and bubbling out. Then replace the cap? Thanks in advance.
Senior Member
Joined: Jul 2012
Posts: 9,003
From: C-Town
just a few scratches here and there and a bruised left hand but not too bad. I do have a question though. I don�t think there�s any bleeder valves so do I just take the cap off the radiator and run it till it�s warmed up and bubbling out. Then replace the cap? Thanks in advance.


