When you click on links to various merchants on this site and make a purchase, this can result in this site earning a commission. Affiliate programs and affiliations include, but are not limited to, the eBay Partner Network.
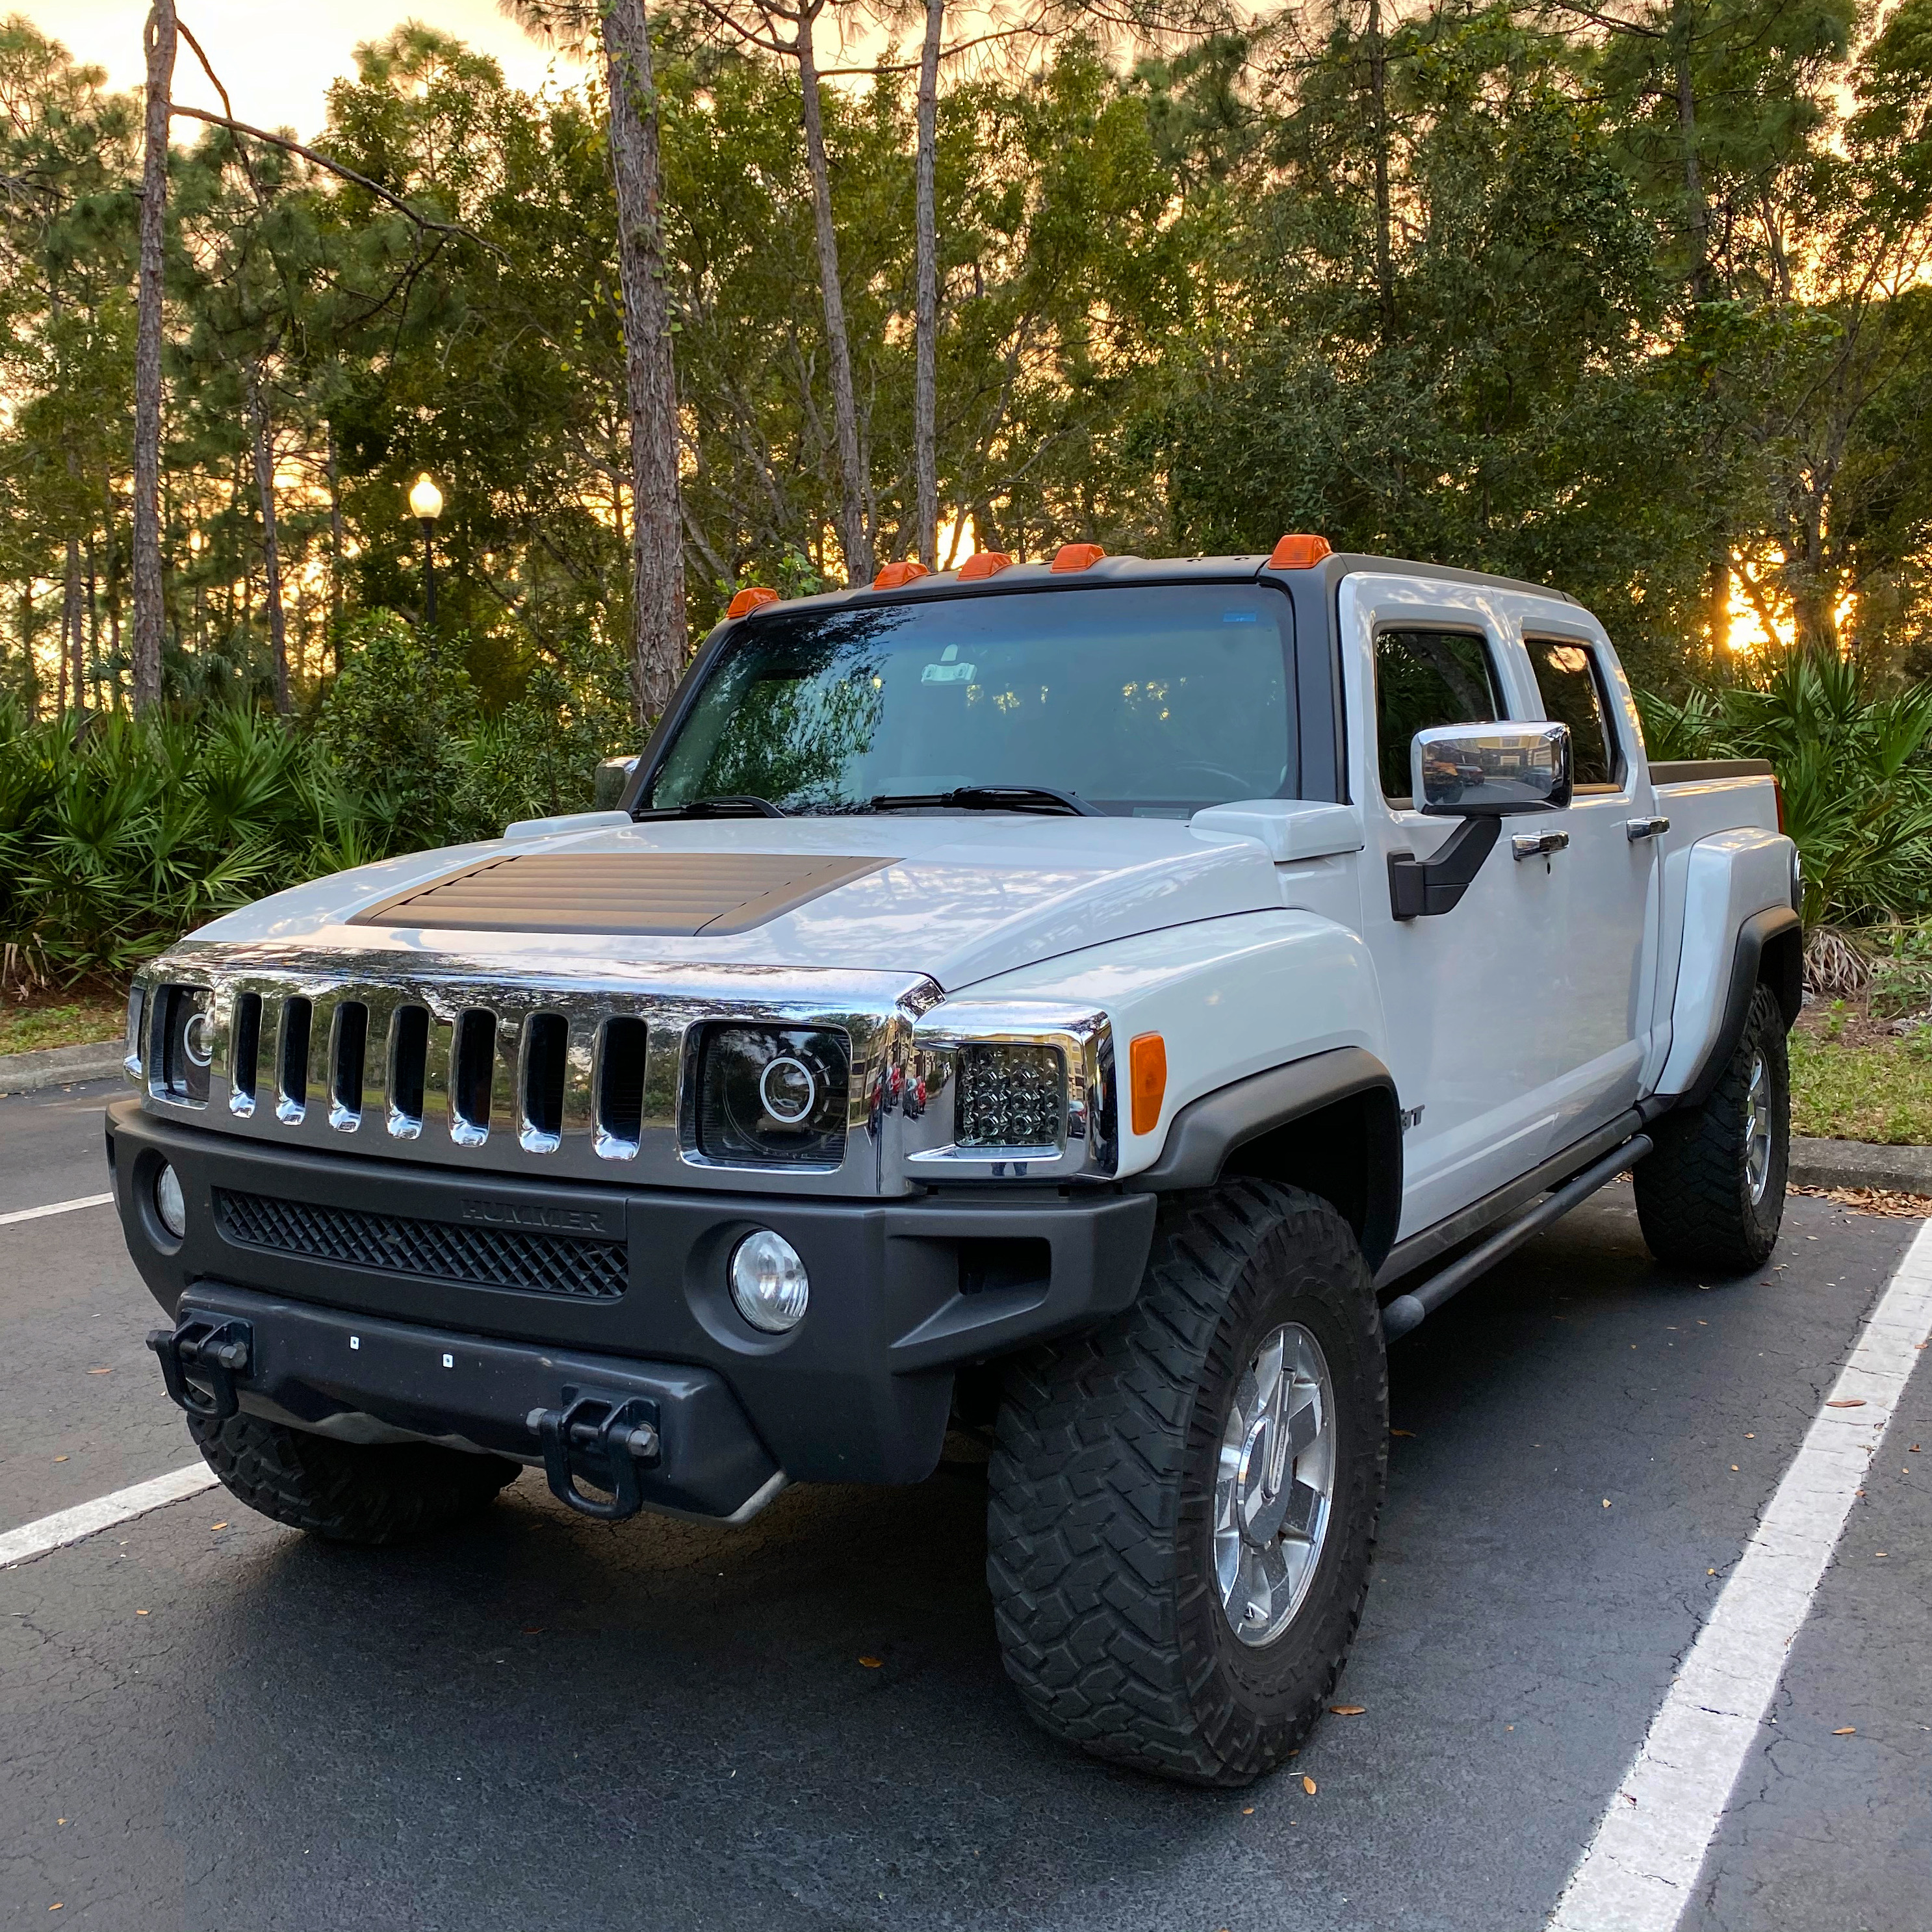
Hummer H3For the Hummer driver who wants the rugged look and off road capabilities of the Hummer, but in a smaller size and with a more fuel economy friendly engine.
..."draining all the GM antifreeze from the system and replacing with Redline Water Wetter since the truck doesn't need the antifreeze properties here in FL and the Water Wetter cools much better."
Since when???? Antifreeze is not just for freeze protection and a Mustang is a far cry from a 5000# H3T.
� Antifreeze keeps the water in your radiator and engine from freezing in cold temperatures.
� Antifreeze also keeps that same water from boiling over in hot temperatures.
� Antifreeze also serves as a lubricant for the moving parts it comes in contact with, such as the water pump.
The main ingredient in the coolant used today is ethylene glycol. If it is mixed correctly (a 50/50 mix of antifreeze and water is ideal), the ethylene glycol can keep your radiator fluid from freezing even in temperatures reaching as low as 30 degrees below zero and also keep those fluids from boiling in temperatures reaching as high as 275 degrees Fahrenheit.
Otherwise, cool beans! Get the pun there?
Hey Doc!
Hope you're doing well. That's just my opinion (and to many others out there) on the Water Wetter. I always advise others to do as they please unless they feel different.
You are right, anti-freeze is not just for freeze protection and I don't recommend using only distilled water and Water Wetter on northern vehicles at all. My reasons for using Water Wetter on my heavy and light vehicles is that since I am in FL, I don't need the freeze protection down here since it never gets that low. If I leave FL, I would change the coolant as needed. I have used this on all my vehicles (previous and current) and haven't had an issue yet. This setup above we are talking is about 2 years old using Water Wetter with no issues before I changed it all up, and still using it now.
Basically to me, it cools the vehicle faster than anti-freeze does, with rust and corrosion benefits, with no issues. You can still run it with anti-freeze if you'd like, for benefits up north (just not as much as water).
Love ya man, as always. Our ideas on Water Wetter will always be different and I know they will be (for others too). Side note: Air Docs intake came out perfect with it (thanks again).
..."draining all the GM antifreeze from the system and replacing with Redline Water Wetter since the truck doesn't need the antifreeze properties here in FL and the Water Wetter cools much better."
Since when???? Antifreeze is not just for freeze protection and a Mustang is a far cry from a 5000# H3T.
• Antifreeze keeps the water in your radiator and engine from freezing in cold temperatures.
• Antifreeze also keeps that same water from boiling over in hot temperatures.
• Antifreeze also serves as a lubricant for the moving parts it comes in contact with, such as the water pump.
The main ingredient in the coolant used today is ethylene glycol. If it is mixed correctly (a 50/50 mix of antifreeze and water is ideal), the ethylene glycol can keep your radiator fluid from freezing even in temperatures reaching as low as 30 degrees below zero and also keep those fluids from boiling in temperatures reaching as high as 275 degrees Fahrenheit.
Otherwise, cool beans! Get the pun there?
If you're driving around @275�F, you will need more than coolant! Btw, water is more effective dissipating heat, and a higher system pressure increases the boiling point.
Boiling Point, Pressure, and Coolant
For a cooling system to reject the most waste heat from the engine, the coolant must remain in a liquid form, instead of boiling to a vapor state. As a result, maximizing the boiling point of the coolant used is a consideration. Fortunately, modern cooling systems take this into account.
A few things that you may remember from your high- school chemistry class are the physical properties of water. Pure water boils at 100 degrees Centigrade (212 degrees Fahrenheit) and it freezes at 0 degrees Centigrade (32 degrees Fahrenheit). These phase changes occur under normal atmospheric conditions. When water is placed under pressure, it has a harder time making the state change from a liquid to vapor. When under pressure, it takes additional heat to get the water boiling. At 14.7psi (~1 bar) above atmospheric pressure, water boils at 250 degrees Fahrenheit (121 degrees Celsius).
When you install an aftermarket 1.3 bar (18.9 psi) radiator cap, the boiling point for pure water in your cooling system is raised to 256 degrees Fahrenheit (124 degrees Celsius). In addition to pressurizing the cooling system, changing the coolant from pure distilled water to a mixture of water and an ethylene glycol solution can provide additional anti-boiling protection. However, boiling protection is not the only consideration in choosing your coolant mix for your application.
OEMs usually ship their vehicles with a coolant that’s part distilled (or demineralized) water and part “antifreeze.” Today’s antifreeze is generally an ethylene-glycol based fluid that has been treated with additional chemicals to inhibit rust and provide lubrication to the engine’s water pump. Ethylene Glycol solutions have both advantages and disadvantages compared to pure water when used in a cooling system. As previously mentioned, filling 33% or 50% of your cooling system with ethylene glycol will help to raise the boiling point over a pure-water solution. A 33% solution will provide about a 7 degree Fahrenheit (4 degree Celsius) increase in boiling temperature. A 50% solution (a.k.a. 50/50 solution) will raise the boiling point by about 15 degrees Fahrenheit (9 degree Celsius). That’s the good news. The bad news about ethylene glycol/water mixtures is that the solutions specific heat capacity is less than pure water. That same 50% mixture will have a specific heat capacity that is about 20-percent less than pure water. That means as a quart of the 50/50 passes through the cooling system it is only able to carry away 80 percent of the heat from the cylinders that pure water would be able to transfer. In a high-performance application, the desire is to maximize the waste heat transfer through the cooling system. As a result, pure water is generally teamed with a rust inhibitor additive and sometimes a cooling system booster that reduces the surface tension of the coolant. Some of the more popular boosters are available from Royal Purple (Purple Ice), RedLine (Water Wetter), and DEI (Radiator Relief).
If you're driving around @275�F, you will need more than coolant! Btw, water is more effective dissipating heat, and a higher system pressure increases the boiling point.
Boiling Point, Pressure, and Coolant
For a cooling system to reject the most waste heat from the engine, the coolant must remain in a liquid form, instead of boiling to a vapor state. As a result, maximizing the boiling point of the coolant used is a consideration. Fortunately, modern cooling systems take this into account.
A few things that you may remember from your high- school chemistry class are the physical properties of water. Pure water boils at 100 degrees Centigrade (212 degrees Fahrenheit) and it freezes at 0 degrees Centigrade (32 degrees Fahrenheit). These phase changes occur under normal atmospheric conditions. When water is placed under pressure, it has a harder time making the state change from a liquid to vapor. When under pressure, it takes additional heat to get the water boiling. At 14.7psi (~1 bar) above atmospheric pressure, water boils at 250 degrees Fahrenheit (121 degrees Celsius).
When you install an aftermarket 1.3 bar (18.9 psi) radiator cap, the boiling point for pure water in your cooling system is raised to 256 degrees Fahrenheit (124 degrees Celsius). In addition to pressurizing the cooling system, changing the coolant from pure distilled water to a mixture of water and an ethylene glycol solution can provide additional anti-boiling protection. However, boiling protection is not the only consideration in choosing your coolant mix for your application.
OEMs usually ship their vehicles with a coolant that�s part distilled (or demineralized) water and part �antifreeze.� Today�s antifreeze is generally an ethylene-glycol based fluid that has been treated with additional chemicals to inhibit rust and provide lubrication to the engine�s water pump. Ethylene Glycol solutions have both advantages and disadvantages compared to pure water when used in a cooling system. As previously mentioned, filling 33% or 50% of your cooling system with ethylene glycol will help to raise the boiling point over a pure-water solution. A 33% solution will provide about a 7 degree Fahrenheit (4 degree Celsius) increase in boiling temperature. A 50% solution (a.k.a. 50/50 solution) will raise the boiling point by about 15 degrees Fahrenheit (9 degree Celsius). That�s the good news. The bad news about ethylene glycol/water mixtures is that the solutions specific heat capacity is less than pure water. That same 50% mixture will have a specific heat capacity that is about 20-percent less than pure water. That means as a quart of the 50/50 passes through the cooling system it is only able to carry away 80 percent of the heat from the cylinders that pure water would be able to transfer. In a high-performance application, the desire is to maximize the waste heat transfer through the cooling system. As a result, pure water is generally teamed with a rust inhibitor additive and sometimes a cooling system booster that reduces the surface tension of the coolant. Some of the more popular boosters are available from Royal Purple (Purple Ice), RedLine (Water Wetter), and DEI (Radiator Relief).
Here's the cam chop after install with just the stock headers, nothing else. Untuned. Loud as hell and sounds like *** lol. Just a quicky here, we put everything back together for you down below, afterwards...
The sound outside the truck is perfect, loud enough that people will deff notice and hear it chop but not so loud that I worry about waking my neighbors or can't cruise comfortably inside the cabin lol.
Last edited by gpcalero; Oct 16, 2021 at 02:49 PM.
Brought The Duke to my buddy's shop to get custom tuned after the camshaft install!
Performance Cycle and Auto is the name of the shop and it is located in Naples, FL. Brandon Cunningham owns it along with his father and he was the one who tuned it. We used HPTuners software and everything came out quite nicely.
Here's The Duke all strapped down on the dyno for the second time. Again, the front driveshaft was removed and the transfer case was locked in 4-High in order to make it rear-wheel drive to use the dyno.
Here's a video of one of the pulls. Only took 4 pulls to get dialed in to where we wanted it to be on the dyno.
After the final dyno pulls, we went out on the street to perform some drivability tuning and also worked on cam and idle tuning.
All in all, we gained +51 hp and +29 tq peak numbers. Final figures were 269 hp, 276 tq at the rear wheels, which was exactly the hp increased as advertised by Texas Speed lol.
At some point in the future, I'll have to record a new video of the cam idle after the tune for you guys, as it is a little more pronounced.
Drives like stock after the tune, even with the stock converter. And since the cam install, I have only seen a small loss on MPG, 1 MPG less than stock when monitoring before and after.
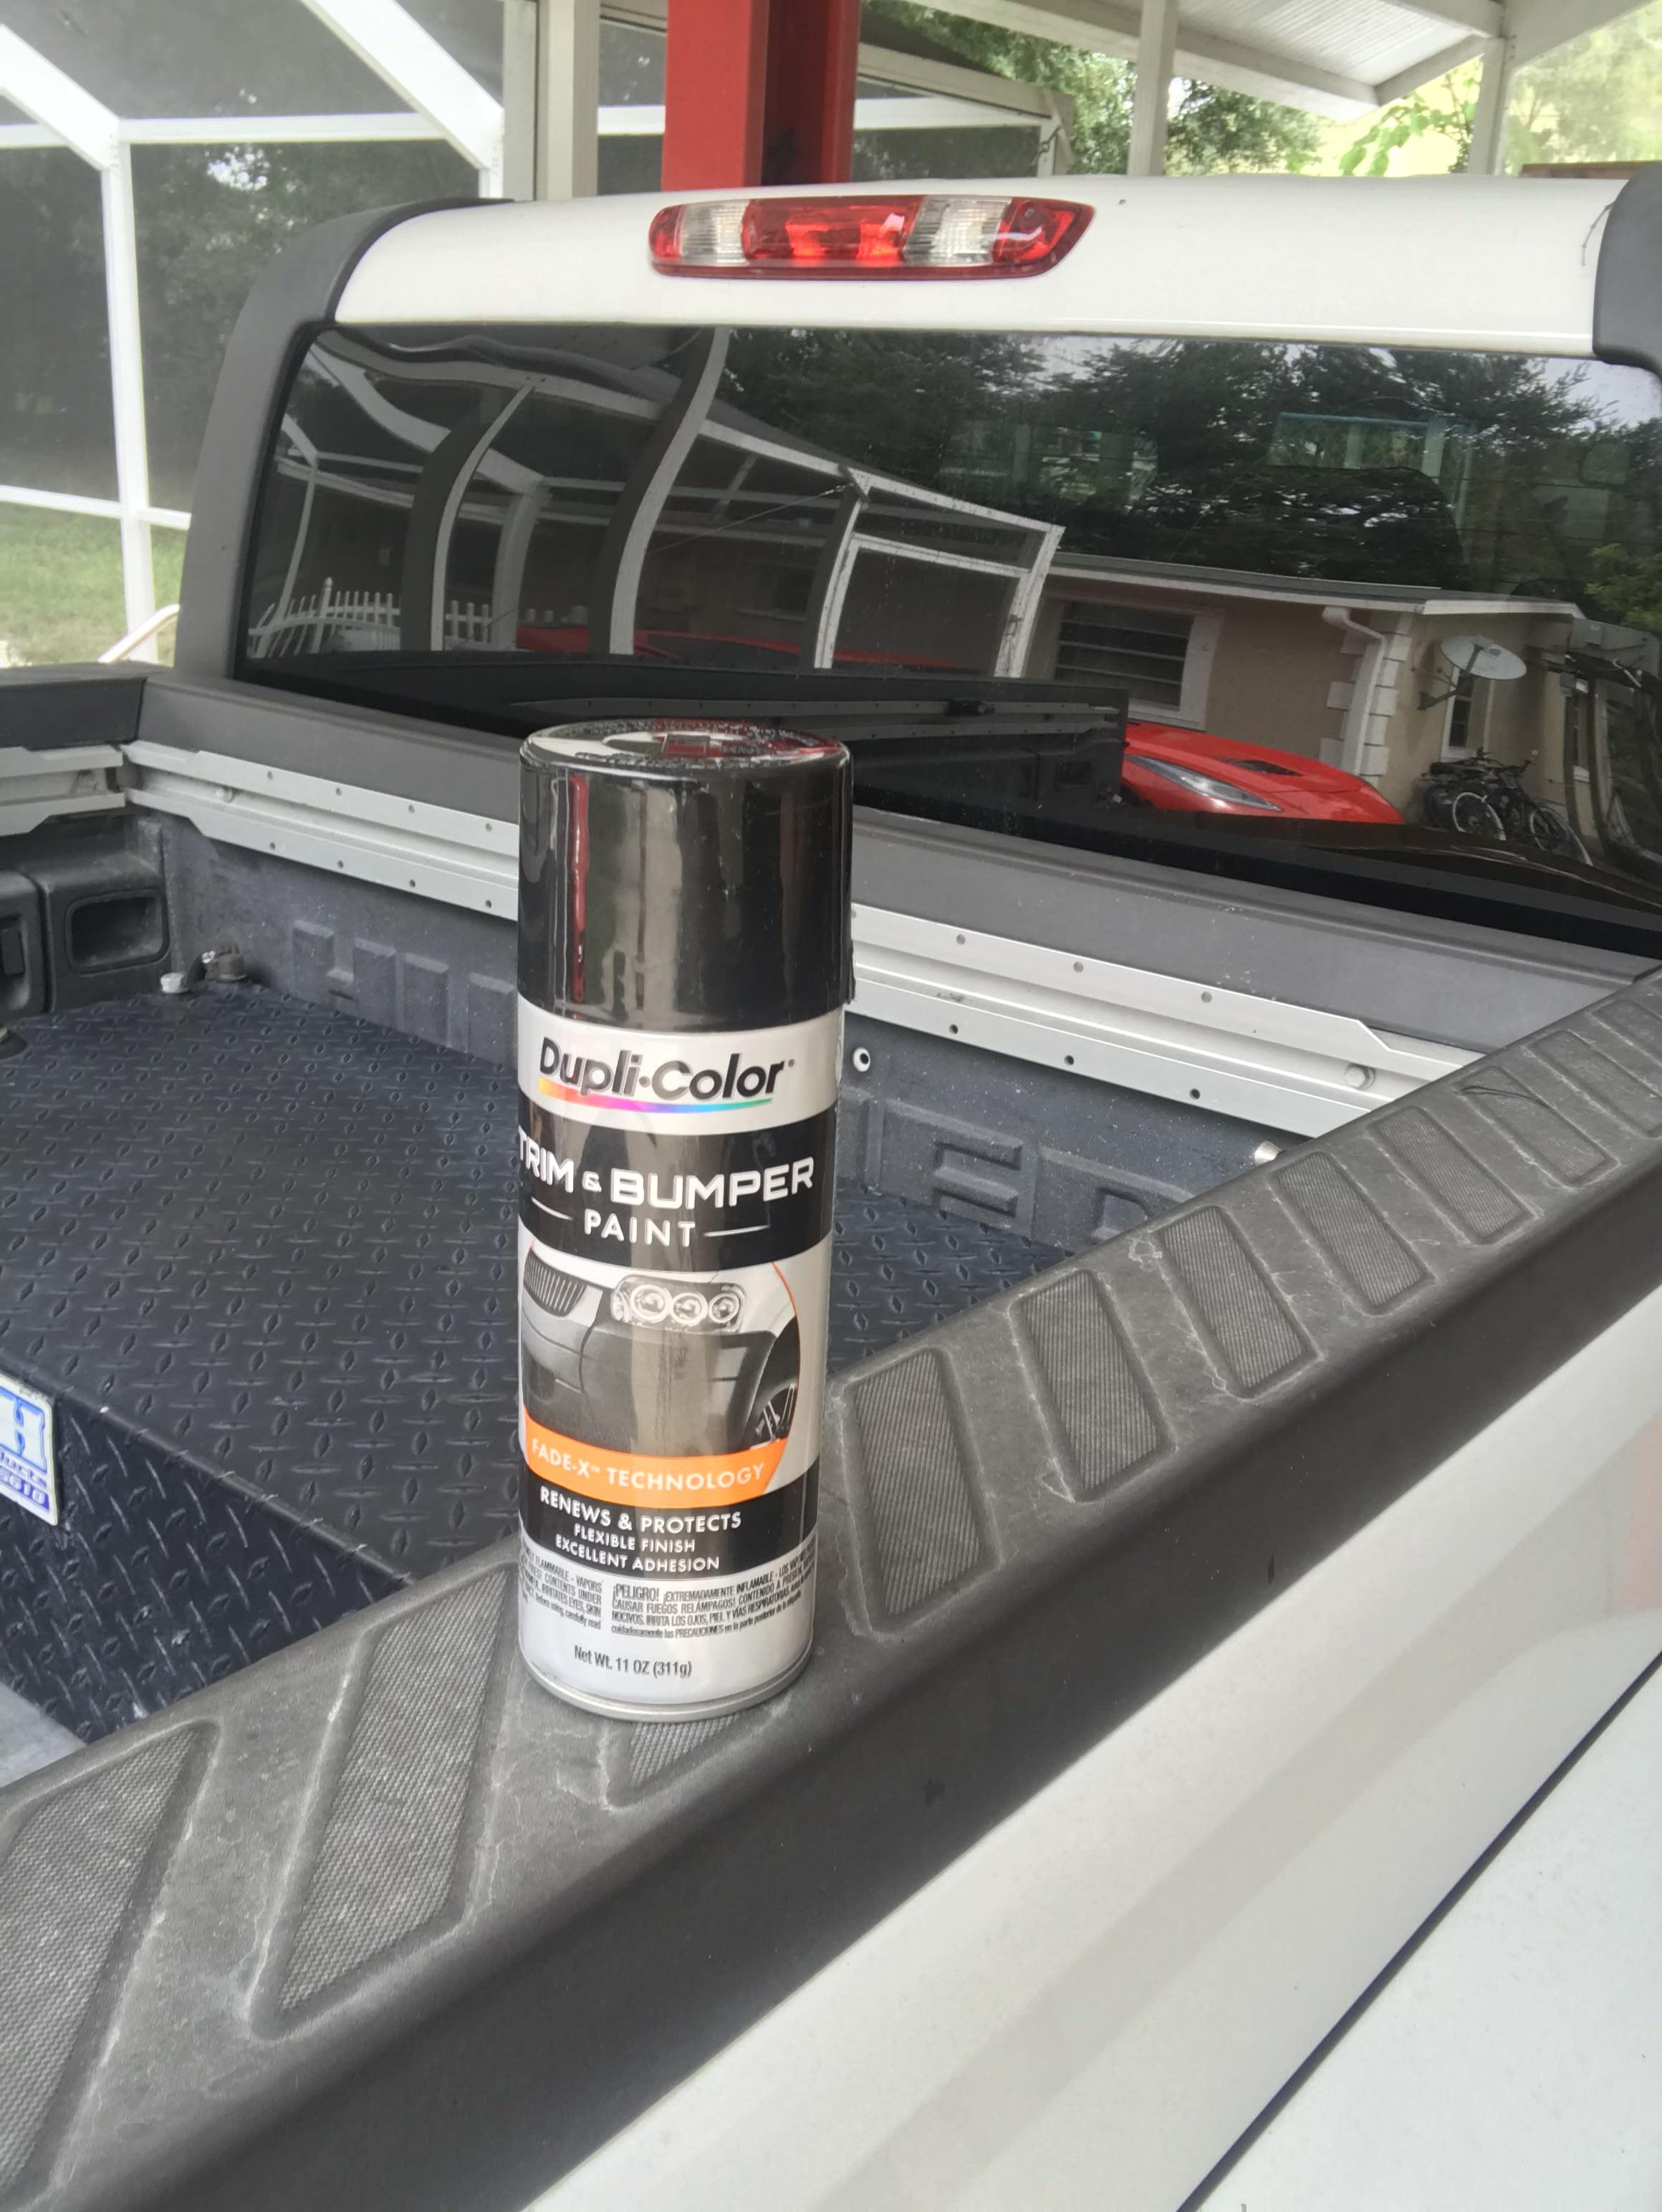
All of the trim on the truck was getting a little weathered, and the front A-pillar trim pieces most of all (like on all H3s for some reason). I kept applying plastic trim restore and honestly, they don't last that long after a detail and takes time to apply. So I looked around and found this trim restore paint from Dupli-Color. Yes, it's a trim paint and not restorer.
Even in the picture you can see how weathered the bed trim is and I wanted to make the truck look as close to new as possible.
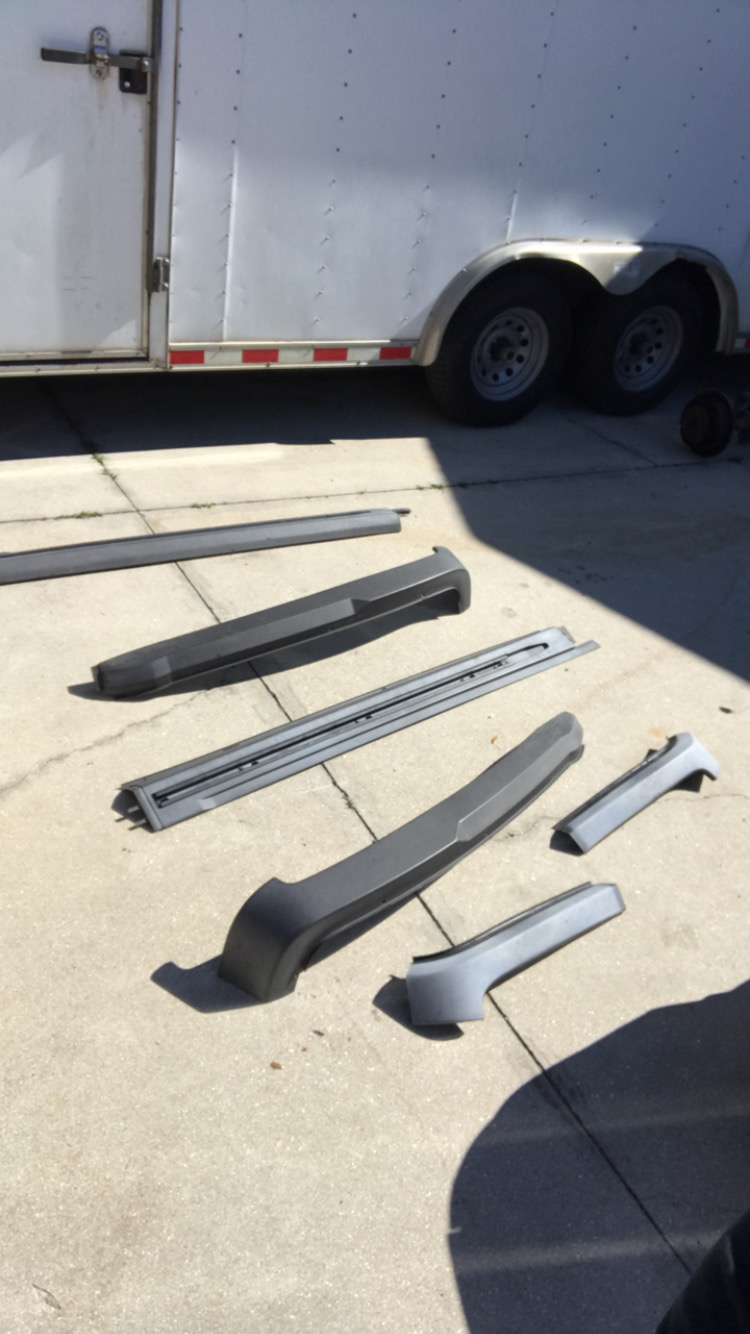
So I began by removing ALL of the trim pieces from the truck. Bed rail trim, rear bumper, tailgate inner wall piece, tailgate outside bottom trim piece A-piller, fake hood vent, roof rack trim & rear cab trim. Only two items I didn't do was the front bumper (new from previous damage), and fender flares because they both looked decent already.
Rear end trim pieces almost all removed here.
Once I removed the trim pieces, I laid them out and washed them with some water and degreaser prior to paint and let them dry in the sun. Notice the difference of fading on each piece. Soon they will all be consistent!
I couldn't find all of my pictures of this process because they are spread out between my phone and GoPro (and I did this a long time ago lol) but I also masked off the whole vehicle except for the bed and trim-painted the plastic bed and even the auxiliary fuel tank after degreasing them. I know the paint is not meant for the tank but I didn't want to drain and unbolt it. Has held up well so far, and if it starts peeling or coming off then I'll remove it and properly paint it or powder coat it black.
Once the bed was done, I moved on to these. I got lucky and scored a set of the roof marker lights off of eBay. Wasn't the cheapest purchase for what they are (basically just plastic pieces) but I always wanted them to complete the look of the truck. Whoever had them didn't install them right on their A-pillar trims, so I decided to dremel out my own A-pillar pieces and swap over the corner lights to mine. Here's how one of them turned out compared to before.
Couldn't find the pics of the install. But if anybody does this on their own then you will need riv-nuts and a riv-nut gun along with some caulking to seal the new holes you will be drilling into your roof.
Finally, after all the trim pieces had cured with a few coats of paint on them, they were reinstalled and a trip to my local tint guy was in order. I elected to go with a light ceramic tint on the front windshield and rear windows/rear cab window, as well as ceramic tint to the front windows dark enough to match the rears (since the rears already had privacy glass from factory).
Here's how it came out after a wash and wax a few days later. Love it. The roof marker lights, tint and trim really freshened up the look of the truck in my opinion. Very happy how it turned out.
Shortly after this, I also installed the roof marker bolt caps (that mine didn't come with) that were 3D printed by German of Lased Designs to cover up those ugly holes you might notice. I also swapped out the bulbs for some LEDs that are much brighter, the bulbs looked really dim at night.
Lots of fun stuff and miscellaneous items in this post.
New in box Rancho 4" suspension lift kit. Was very excited when this showed up!
Being one of the few to be able to snag one of these overlooked kits made me very happy. I consider myself very lucky to have one after actively searching for used kits at the time and to have these just "pop-up" years after they stopped making them.
Trip to the drag strip using the T to tow the race car. The total weight is near the manufacturer limits but she seems to do just fine.
For all you a$$ fans
Around this time, I also did this mod to the lower side-trim piece on the drivers seat. Mine had started to sag down and let itself turn on my seat heater to High. Didn't take a pic of mine, this is one that I found online to address the issue. You put a screw in through the trim panel and into the seat plastic behind it to keep the panel from slipping down. Not my pic below but I did the same....
New tires showed up for the lift install. All loaded up for their temporary new home until the lift goes on.
I went with 35.00x12.50x17 Toyo MT tires. They are a bit heavier than a Trail Grapplers in the same size fyi, but sturdier construction evidently from my research. Really wanted to go with a 37" tire but since I love to daily drive this thing, I figured to table that idea lmao. (MAYBE 37's and new gears one day???)
And here are the new wheels! I absolutely love them. Method Racing 312 in matte black and made from solid A356 aluminum.
Left these with my buddies over at K9 Motorworks to mount and balance for me.
Also pulled the trigger on the Lased Designs dual Optima battery tray. Needed to replace the battery anyways so I purchased two and installed the new Optima Yellowtop in the truck. Mine is still wrapped up and in the box, here's a pic of how they look from German of LD. I need to get around to installing it, the battery and tray have been sitting in my garage for quite a while now lol. Still deciding on what color to powdercoat it. Probably white or black. Hmmmm...
And finally... dropping off a couple of blocks to my engine builder, MPR Racing Engines. One is my buddy's Coyote 5.0 and the other is an aluminum 6.2L LS3, for The Duke. Heh-Heh.... I just well can't leave it alone and I scored a nice little deal to build this thing. For those of you don't know, the 6.2L LS3 will drop right in an Alpha. Just need to re-use the Alpha LH8 specific oil pan and the Alpha LH8 headers.
Another track day excursion with the H3T as the tow pig.
I think The Duke looks extremely sharp pulling the race car behind it. Plan is to continue to use it and make a few changes to help towing in the future.
New 35x12.5x17 Toyo MT tires mounted up on the Method Racing 312 wheels and how they look against this Mustang. Really like these wheels lol.
Then, a beach day with the T. Lazy summer day at the beach was long needed and right about now I could use another
Getting closer and closer to getting you guys to present day.
New custom built 6.2L LS3 short block is done. The rotating assembly is rated to 1000 rwhp according to Tim, the engine builder, although I won't be pushing anywhere near that figure. The plan is to keep it N/A and take advantage of the extra torque and displacement. Eagle crankshaft and Mahle pistons. The pistons are just slightly under the compression ratio of what a stock LS3 slug has.
Heads are complete!
They are used LS3 castings that I had MPR port with Manley stainless steel intake and exhaust valves, and had the deck milled just a bit to bring back some of the compression lost from the pistons. With the new valve chamber volume, head gasket, and pistons, the compression ratio on this motor is going to be 11.2:1. In comparison, an LS3 engine with gaskets has a stock compression ratio of 10.7:1. So the 11.2 CR is going to be perfect for an N/A truck.
It's a shame that I'll be covering these beauties up!
Here you can see the exhaust ports and the BTR Platinum dual valve spring kit installed. They are good for up to .660" of lift.
And the view of the intake side with the ports cleaned up a bit by MPR. Should flow quite nicely.
And finally, the completed long block assembled.
Has a new front timing cover with new sensors, new crank pulley (didn't see the need for an aftermarket high performance one in trucks intended use, Melling high output oil pump, and some nice matte black Holley valve covers that delete the ugly looking coil brackets. The valve covers put the coils at an angle and comes with a billet oil fill cap. Probably forgetting something but if you have a question, ask away.
The fun part of the engine is the new Texas Speed camshaft. I guess I never took a picture of it but I went a bit more aggressive (proportionally) than what is in the 5.3 that is in the truck now because I am going to be putting in a new torque converter. New cam specs are 224/236 & .600/.600" lift with a 111 LSA. She should be pretty damn rowdy lol.
Pretty much up to speed on the motor stuff. Next steps are to order a new converter and start compiling parts to build the transmission during the engine swap. I have no doubt in my mind that it'll break with the newfound power if I don't build it. I've spoken to a few people that have broken these 4L60E's and 2 that have done the 6.0/6.2 swap and will definitely be purchasing new high strength parts like hardened input/output shafts and upgraded sun-shell and planetaries.
Very excited to put The Duke's new heart in when everything is in order!
So this package arrived from Texas Speed & Performance... The Duke is getting a camshaft upgrade!
This is a TSP Stage II truck cam. This is the low lift version (still plenty more than stock) and nothing too crazy because I choose to daily drive The Duke and don't want to put in a converter at this point. Specs are 212/218 duration, .550/.550 lift & opted for the lower 111 LSA option. This does a couple different things for me. 1) it brings the power in sooner/lower in the power band, and 2) the lower LSA will typically "chop" more pronouncedly for that V8 muscle sound. Since it's a truck, I want the power to come in more on the bottom end. Also included was an ARP cam bolt (more on that later) and GM Performance LS6 valve springs to handle the extra lift on this cam.
Here's a video of one of the runs. This is all I took because the traction control system was being a pain to deal with. Things is more fussy than my Mustang. As some of you may know, the traction control system on some models (I think the later ones) aren't fully defeatable with the traction control switch so it'll like to kick in and toast the brakes, pull power etc. So just take the easy way out and find the traction control fuse and yank that sucker out before you dyno.
I think you about nailed the cam selection. You do not want the LH8 to get soggy down low so the ballpark is 215ish duration and appx .050ish lift. Exactly where you went. Do you happen to know where the intake valves close on that TSP cam? Is it somewhere about 40 ABDC? Just curious. Sounds great.
I am on that same trail, but seriously thinking of adding a F.A.S.T. Intake to the mix, again to keep low end AND boost the top a notch (small notch). I was not looking at the TSP cam, but it is now on the radar for when parts start moving in my direction.
You can tune out the TC with HP tuners, but we saw that you should leave in some very small amount or the system starts to have erratic glitches. I was at a local tuner with a customer and his 09 RWD Colly LH8 as a spectator. A lot less weight than a H3/T, but almost as FUN!


 Still deciding on what color to powdercoat it. Probably white or black. Hmmmm...