
Replacing DRL Assembly

^exactly that was the main reason I didn't go with Delta. I was about ready to hit the purchase button but didn't at the last second. Found my own mod and went that route. No way was I hacking up my plastic bumper....especially for the price they go for!

Senior Member
Joined: May 2011
Posts: 371
From: AZ
05,
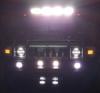
LoJac installed LED's into my DRL's like he did with his rig. After he did his, he come over to my place and we did my rig. They work really great. He can give you more info about them than I can but what I can say is that they are 5 bright LED's in a 4" housing, the same size as the OEM DRL's are. I believe they are 18 watts and operate on any 12 volt system. They have only 2 wires that I tapped right into the DRL harness then simply tucked away the extra slack. LoJack can give you more info on the install part, I did the wiring part. He does have a thread on this and it shows how he did them.
After hearing from LoJac963, if you are still interested, I have another brand new pair still in the box in my garage that I could sell you cheap. Let me know.
FYR pretty much said it. Any 4" round light would replace the stock DRL's. The reason I went with the ones I have and let FYR know which ones to buy was the fact that they are threaded on the rear of the housings. Using threaded rod you can make studs and using lock nuts they will fit the stock bolt holes. No cutting, drilling or anything, take out the old, replace with the new and wire into the factory harness.
That's it in a nutshell.
That's it in a nutshell.
Senior Member
Joined: May 2011
Posts: 371
From: AZ
yes, you should be able to PM me. Click on my title and the PM option should come up for you to send. I sent you an email.
Last edited by fyr145; May 2, 2014 at 01:04 AM.

Member
Joined: Oct 2012
Posts: 46
From: Ohio-From Texas
Do the led lights that LoJac installed have any sort of amiability? I have a 27 watt led light that I believe is the same, set up as a reverse light and I had buddy that was behind me in a smaller car and said it was blinding. I does put an awesome amount of light out though.
Last edited by Helga She Is Fine; May 2, 2014 at 05:40 PM.
Senior Member
Joined: May 2011
Posts: 371
From: AZ
Do the led lights that LoJac installed have any sort of amiability? I have a 27 watt led light that I believe is the same, set up as a reverse light and I had buddy that was behind me in a smaller car and said it was blinding. I does put an awesome amount of light out though.
When you make the threaded studs you use 2 locking washers on the end to "sandwich" the plastic of the bumper between them to lock the lights in place. Now when I did mine and FYR's I just made sure the threaded rods were the same length and any adjustments to length by the nuts were done to both the top and bottom making them about perfectly centered in the DRL holes.
You could adjust one rod with more or less length to aim the light higher or lower. However the lights we used are very bright but in flood pattern so the light is so dispersed that aiming really doesn't do much. They do throw some light on the ground but again these are DRL's, they're not meant to be driving lights.
You could adjust one rod with more or less length to aim the light higher or lower. However the lights we used are very bright but in flood pattern so the light is so dispersed that aiming really doesn't do much. They do throw some light on the ground but again these are DRL's, they're not meant to be driving lights.
