
Replacing DRL Assembly


Thread Starter
|
Junior Member
Joined: Nov 2013
Posts: 8
Hey everyone I have a 2003 H2 and am replacing the factory DRLs with a set of JW speaker led auxillary lights (model 6050).
I would like to know if the front bumper needs to be removed first to get to the DRL assembly? Or can I simply remove the DRL housing while the bumper is still attached? I am having my local shop install these but i would like to take a look where they can be mounted beforehand. Thanks for helping this newbie out!
I would like to know if the front bumper needs to be removed first to get to the DRL assembly? Or can I simply remove the DRL housing while the bumper is still attached? I am having my local shop install these but i would like to take a look where they can be mounted beforehand. Thanks for helping this newbie out!

Senior Member
Joined: Jan 2011
Posts: 614
From: N. Hollywood, CA.
Depends on what the back of the new light housing looks like. I recently replace mine with Hummer Parts and Accessories: Delta Tech Industries Hummer H2 & H3 DRL 46 Series H.I.D. Bumper Light Kit (Driving or Fog Lights Av= it required me to remove the bumper assembly completely and cut the back of the fascia to fit the new lights.
I've done mine with aftermarket LED's and they way I installed them I used the factory holes so no changes to the bumper. I actually met FYR today-great guy and we installed a set in his 2 also.
You can take out the factory DRL housings without removing the bumper. Just 2 nuts on the rear of the bumper and the housing will come right out. I'm not sure what the LED's you bought look like but they really shouldn't need to remove your bumper. There's plenty of room back there.
You can take out the factory DRL housings without removing the bumper. Just 2 nuts on the rear of the bumper and the housing will come right out. I'm not sure what the LED's you bought look like but they really shouldn't need to remove your bumper. There's plenty of room back there.
Senior Member
Joined: May 2011
Posts: 371
From: AZ
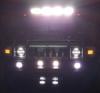
Just got back from driving around in my new DRL mod (many THANKS to LoJac963 for all his help and skills!!!)  And I must say that they are great!
What a difference the LED's are compared to stock. A mod definately worth doing..........I would highly recommend doing this one to the group here.
And I must say that they are great!What a difference the LED's are compared to stock. A mod definately worth doing..........I would highly recommend doing this one to the group here.
Thread Starter
|
Junior Member
Joined: Nov 2013
Posts: 8
LoJac, did you have to mount your lights at an angle to get them to fit into the factory holes? It looks like you did from the pics in your install, I would look into that but I need to mount my lights completely straight as they have a very specific light pattern/cutoff.
Thread Starter
|
Junior Member
Joined: Nov 2013
Posts: 8


These are the lights and the brackets they came with and here is the website for both the 6050's that i bought and the 6045's that come without the rubber bracket. I think my best bet will be to have a hole drilled into the black steel bumper as the level looks perfect. Headlights - Products - J.W. Speaker Corporation
Headlights - Products - J.W. Speaker Corporation
Winter,
The way I installed mine and FYR's is to cut off the mounting boss. However the lights we used have an all aluminum housing so it wasn't an issue to grind them off, file smooth and paint.
Your lights on the other hand are very interesting looking. I went with the ones I have because the way I have the studs mounted it uses the stock bolt holes as the lights have holes on the back to screw studs into.
Yours I'm not sure if they have mounts on the rear but there would really be no way to fit those lights in the holes with that big bracket on the bottom. You could try flipping that bracket all the way to the back so the bolt sticks out towards the rear and use that to mount them. However I think it may be too low.
You'd have to just play around with it and see what you can come up with. Take a pic of the back of them and post it also.
Just got back from driving around in my new DRL mod (many THANKS to LoJac963 for all his help and skills!!!) And I must say that they are great!
What a difference the LED's are compared to stock. A mod definately worth doing..........I would highly recommend doing this one to the group here.
And I must say that they are great!What a difference the LED's are compared to stock. A mod definately worth doing..........I would highly recommend doing this one to the group here.
Senior Member
Joined: May 2011
Posts: 371
From: AZ

Senior Member
Joined: Jan 2011
Posts: 614
From: N. Hollywood, CA.
I've done mine with aftermarket LED's and they way I installed them I used the factory holes so no changes to the bumper. I actually met FYR today-great guy and we installed a set in his 2 also.
You can take out the factory DRL housings without removing the bumper. Just 2 nuts on the rear of the bumper and the housing will come right out. I'm not sure what the LED's you bought look like but they really shouldn't need to remove your bumper. There's plenty of room back there.
You can take out the factory DRL housings without removing the bumper. Just 2 nuts on the rear of the bumper and the housing will come right out. I'm not sure what the LED's you bought look like but they really shouldn't need to remove your bumper. There's plenty of room back there.