
Sunroof Drain Upgrade


")

Senior Member
Joined: Jul 2012
Posts: 9,047
From: C-Town

Last edited by hummerz; Jul 24, 2012 at 05:11 PM.

Senior Member
Joined: Apr 2010
Posts: 568
From: The Mitten
Water can come in around the entire edge of the sunroof but mostly around the front edge. Your sunroof may be out of adjustment as well as the drains being clogged. It kind of amazes me that the sunroofs seal so poorly on this vehicle.

Junior Member
Joined: Jun 2011
Posts: 14
From: Connecticut
Tell me about it. This is stupid. Finally talked State Farm into paying for new weather stripping, sealant, and labor on those parts...equals about $300. The other $700 that the dealership wants will come out of my pocket.
Senior Member
Joined: Jul 2012
Posts: 9,047
From: C-Town
I dont think new seals will stop the leak? they are not watertight.... the motor only closes the window and doesn't put much pressure on it to seal???
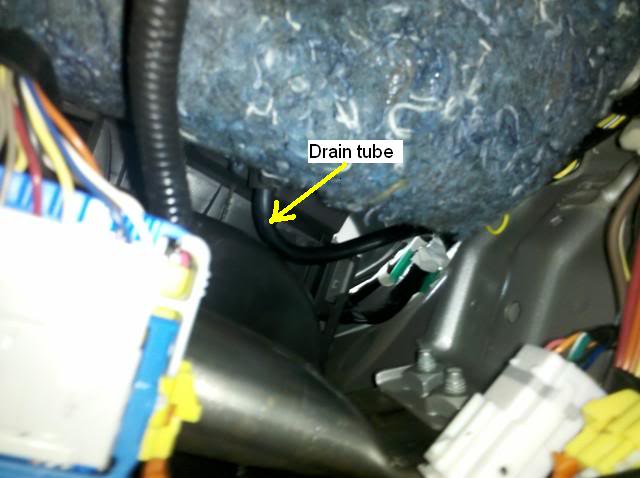
clean the drain tubes!!!!!
drivers side drain is under the dash behind the tachometer, (grommet attached to the tube) you can pull it out of the firewall if need to and push it back in when cleared..
Passenger side is behind the side dash cover (look in towards the firewall/ upwards and you can pull it out):
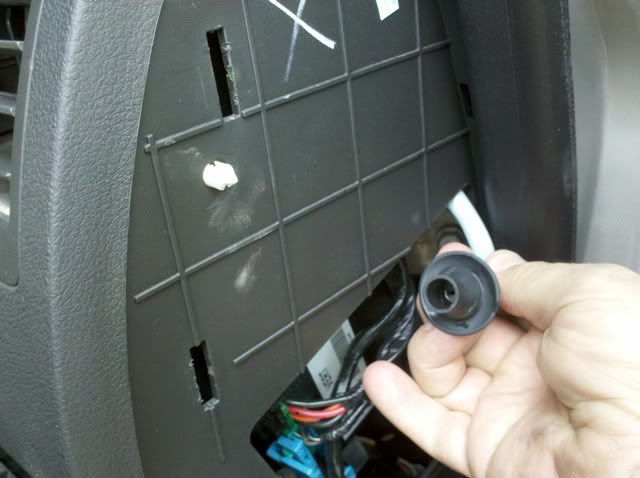
Now you have both ends of the drain tubes: Upside is in front of the sunroof channels both corners, and lower sides are shown above... Clean the tubes and push the tube grommets firmly back into the firewall...
clean the drain tubes!!!!!
drivers side drain is under the dash behind the tachometer, (grommet attached to the tube) you can pull it out of the firewall if need to and push it back in when cleared..
Passenger side is behind the side dash cover (look in towards the firewall/ upwards and you can pull it out):
Now you have both ends of the drain tubes: Upside is in front of the sunroof channels both corners, and lower sides are shown above... Clean the tubes and push the tube grommets firmly back into the firewall...

Junior Member
Joined: May 2012
Posts: 4
Have an '06 H3. Sunroof is leaking and water is coming through OnStar mic. I'll check for clogged drain tubes which seems to be a common problem. Sunroof switch seems to be malfunctioning. To close the sunroof I believe the switch needed to be pushed and released. It then closed to the point where it sealed. Now I have to hold the switch in the forward position until I think it is closed all the way. Any ideas? It may just be that the switch needs to be replaced. Thanks in advance for any advice.

Senior Member
Joined: May 2008
Posts: 836
From: Blacksburg, VA
Have an '06 H3. Sunroof is leaking and water is coming through OnStar mic. I'll check for clogged drain tubes which seems to be a common problem. Sunroof switch seems to be malfunctioning. To close the sunroof I believe the switch needed to be pushed and released. It then closed to the point where it sealed. Now I have to hold the switch in the forward position until I think it is closed all the way. Any ideas? It may just be that the switch needs to be replaced. Thanks in advance for any advice.
2. Turn the ignition to ON.
3. Completely close the sunroof window with the manual close switch.
4. Press the sunroof vent switch to the vent open position until the sunroof window stops,and continue holding the switch for at least 10 seconds.
Junior Member
Joined: May 2012
Posts: 4
Thanks much for the suggested solution. I don't have a service manual but should probably get one. Need to reset the tire pressure monitors as well as the shop that rotated the tires must not have reset them.
Senior Member
Joined: Jul 2012
Posts: 9,047
From: C-Town
Each TPMS sensor has a unique identification code. Any time you replace one or more of the TPMS sensors, install the spare tire onto your vehicle, or rotate your vehicle�s tires, the identification codes will need to be matched to the new tire/wheel position. The sensors are matched to the tire/wheel positions in the following order: driver�s side front tire, passenger�s side front tire, passenger�s side rear tire, and driver�s side rear tire using a TPMS diagnostic tool.
See your dealer for service.
The TPMS sensors may also be matched to each tire/wheel position by increasing or decreasing
the tire�s air pressure. If increasing the tire�s air pressure, do not exceed the maximum inflation pressure indicated on the tire�s sidewall.
You will have one minute to match the first tire/wheel position, and five minutes overall, to match all four tire/wheel positions.
If it takes longer than one minute, to match the first tire and wheel, or more than five minutes
to match all four tire and wheel positions the matching process stops and you will need to start over.
The TPMS sensor matching procedure is outlined below:
- 1. Set the parking brake.
- 2. Turn the ignition switch to ON with the engine off.
3. Turn the exterior lamp switch from AUTO to ON four times within three seconds. A double horn chirp will sound and the TPMS low tire warning light will begin to flash. The double horn chirp and flashing TPMS warning light indicates the TPMS matching process has started. The TPMS warning light should continue flashing throughout the matching procedure. The SERV TPM message will be displayed on the Driver Information Center (DIC).
- 4. Start with the driver�s side front tire.
- 5. Remove the valve cap from the valve cap stem. Activate the TPMS sensor by increasing or decreasing the tire�s air pressure for 10 seconds, then stop and listen for a single horn chirp. The single horn chirp should sound within 15 seconds, confirming that the sensor identification code has been matched to this tire and wheel position.
- ( If you do not hear the confirming single horn chirp, you will need to start over with step number one. To let air-pressure out of a tire you can use the pointed end of the valve cap, a pencil-style air pressure gage, or a key.)
6. Proceed to the passenger�s side front tire, and repeat the procedure in Step 5.
7. Proceed to the passenger�s side rear tire, and repeat the procedure in Step 5.
- 8. Proceed to the driver�s side rear tire, and repeat the procedure in Step 5.
9. After hearing the confirming horn chirp for the left rear tire, check to see if the TPMS warning light is still flashing. If it is, turn the ignition switch to LOCK. If the TPMS warning light is not flashing, the five minute time limit has passed and you will need to start the process over beginning with Step 1.
10. Set all four tires to the recommended air pressure level as indicated on the Tire and Loading Information label.
11. Put the valve caps back on the valve stems.
- 12. Start vehicle and warning light should be off or drive vehicle and warning light should go off within 1 mile.