LIGHT BAR PART 2


#22
 11-24-2007, 10:05 AM

ORIGINAL: Golden Shellback
Here's the RealWheels light bar. I can fit the H3 in an 8 ft. high garage door with the light bar and lights on there.
Here's the RealWheels light bar. I can fit the H3 in an 8 ft. high garage door with the light bar and lights on there.

#24
11-24-2007, 11:02 AM
The other thing I don't like about the RealWheels light bar is the base is not straight up. It looks weird when look at it from the front, see pic.
[IMG]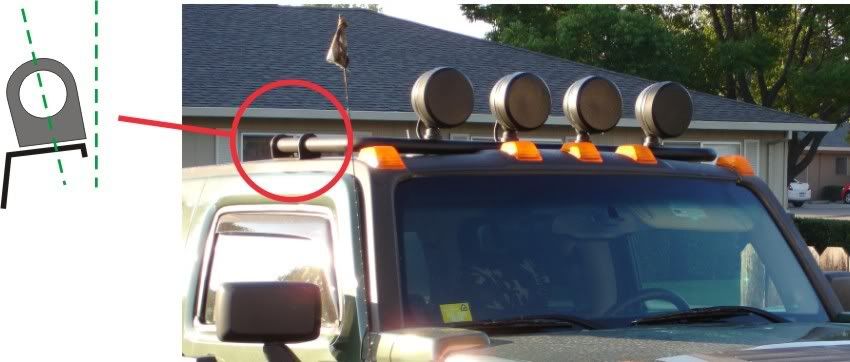 [/IMG]
[IMG]
[/IMG]
#25
11-24-2007, 11:23 AM
ORIGINAL: Golden Shellback
The other thing I don't like about the RealWheels light bar is the base is not straight up. It looks weird when look at it from the front, see pic.
The other thing I don't like about the RealWheels light bar is the base is not straight up. It looks weird when look at it from the front, see pic.
 Mike, have you thought up a name for your light bar? How about the RealLightBar? Since it's based of the RealWheels design (but greatly improved).
#26
11-25-2007, 10:23 AM

hey blow, i mean, HILLjob, can you weld aluminum? some low profile "ammo" boxes to go on the roof rack would be awesome, but steel is kinda heavy and rusts - and the smaller ATV boxes are outrageously priced. a nice 5" high box would be awesome to keep the muddy straps and shackles in. 
#27
11-25-2007, 02:20 PM

i can weld aluminum,but i dont have the right wire or gas..
this light bar is no more then 2 1/2 inches off the top of the roof to the top of the bar.the front mounts are angled,but they have to follow the roof lines.only mine is welded to the bottom of the bar,not a hole like the other ones
you see how that bar bowes to the front in shellbacks last post,mine doesnt do that,thats just gay.i got rescues and shellbacks bars done friday,just awaiting for payment on one of them.then if someone else wants one.i will see what i can do,but you will have to give me some time due to holidays and long hours.sorry,no more pics right now,i thought my batteries were bad,but i think something else is wrong w/ my camera
#28
11-25-2007, 04:56 PM

I think you are on to the best light bar out there now. How does it attach in the front to the plastic roof trim bolts? Instead of having the mounts rest on the plastic trim, could you do longer bolts with standoffs so that the front bar mounts aretight to the structure of the roof instead of resting on the plastic trim? That could help control bounce.
#29
11-25-2007, 05:12 PM
you could do that,but i can find a bolt that long,it take a 6mm thread,and you would have to drill a hole through the bar big enough to fit a socket,it rests pretty good,it does not have very much bounce at all,i think my light bar looks killer,that front mounts does need something defferent,i wonder if i made a tube and welded a threaded end and drilled and tapped the top,kinda like this,i would have to drill a hole in the light bar,weld a washer to the tube.kinda like this

#30
11-25-2007, 05:49 PM
ORIGINAL: hilljob26
you could do that,but i can find a bolt that long,it take a 6mm thread,and you would have to drill a hole through the bar big enough to fit a socket,it rests pretty good,it does not have very much bounce at all,i think my light bar looks killer,that front mounts does need something defferent,i wonder if i made a tube and welded a threaded end and drilled and tapped the top,kinda like this,i would have to drill a hole in the light bar,weld a washer to the tube.kinda like this

you could do that,but i can find a bolt that long,it take a 6mm thread,and you would have to drill a hole through the bar big enough to fit a socket,it rests pretty good,it does not have very much bounce at all,i think my light bar looks killer,that front mounts does need something defferent,i wonder if i made a tube and welded a threaded end and drilled and tapped the top,kinda like this,i would have to drill a hole in the light bar,weld a washer to the tube.kinda like this
ABS plastic can't withstand cycling loads very well especially with temperature variation too. If you can fix the front of your bar with a secure metal to metal connection, you've got the best solution.

