
How to replace the power mirror adjustment motor on a 2008-09 Hummer H2


Thread Starter
|
Junior Member
Joined: Oct 2016
Posts: 24
From: Oxford, CT
I took some pics while I did this so we could have a specific and complete thread on the procedure...
NOTE: This procedure is only for the mirror adjustment motors, not the power-fold-in motors.
Tools & parts needed:
� Mirror Motor - GM Part 19167560
� Large flat-head screwdriver or pry bar
� T10 Torx driver
� Silicone dielectric grease (optional, but recommended)
I bought my new motors on Amazon (http://a.co/8knBcaQ) but they are available elsewhere for a few bucks cheaper.
The mirror glass is attached to the motor, which attaches to the mirror housing with three Torx T10 screws. First step is to remove the mirror.
Pull the top inside corner of the mirror by hand out as far as it will go.

Look behind the mirror glass and identify the black plastic collar with the locking tabs around it. The collar is part of the motor, while the tabs are on the back of the mirror glass.
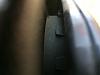
Gently start pulling the mirror glass out while prying one of the tabs off the collar.
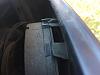
Once loosened, remove the mirror glass entirely by pulling straight out to expose the motor mounted in the mirror housing.
It is not necessary to remove the wires on the mirror, but if you do, clean the connections and put some silicone dielectric grease on the connectors before reassembling so they don�t give you any trouble down the road.
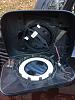
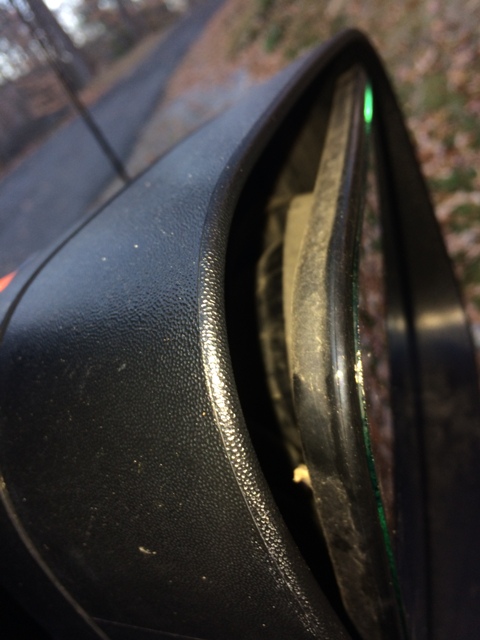
Remove the three Torx-head screws holding the old motor to the housing. The screws are located where the yellow grease pencil marks are in this picture.
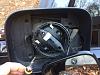
Disconnect the wiring harness on the back of the motor, put some silicone dielectric grease on the connector, then attach it to the new motor, and attach the new motor with the three Torx-head screws.
Center the mirror over the housing so that the tabs fit over and around the motor collar, and press in to snap the mirror glass into place.
If all goes well, that should have taken no more than 5 minutes to do.
NOTE: This procedure is only for the mirror adjustment motors, not the power-fold-in motors.
Tools & parts needed:
� Mirror Motor - GM Part 19167560
� Large flat-head screwdriver or pry bar
� T10 Torx driver
� Silicone dielectric grease (optional, but recommended)
I bought my new motors on Amazon (http://a.co/8knBcaQ) but they are available elsewhere for a few bucks cheaper.
The mirror glass is attached to the motor, which attaches to the mirror housing with three Torx T10 screws. First step is to remove the mirror.
Pull the top inside corner of the mirror by hand out as far as it will go.
Look behind the mirror glass and identify the black plastic collar with the locking tabs around it. The collar is part of the motor, while the tabs are on the back of the mirror glass.

Gently start pulling the mirror glass out while prying one of the tabs off the collar.

Once loosened, remove the mirror glass entirely by pulling straight out to expose the motor mounted in the mirror housing.

It is not necessary to remove the wires on the mirror, but if you do, clean the connections and put some silicone dielectric grease on the connectors before reassembling so they don�t give you any trouble down the road.
Remove the three Torx-head screws holding the old motor to the housing. The screws are located where the yellow grease pencil marks are in this picture.

Disconnect the wiring harness on the back of the motor, put some silicone dielectric grease on the connector, then attach it to the new motor, and attach the new motor with the three Torx-head screws.
Center the mirror over the housing so that the tabs fit over and around the motor collar, and press in to snap the mirror glass into place.
If all goes well, that should have taken no more than 5 minutes to do.


Thread
Thread Starter
Forum
Replies
Last Post
a0128
PRIVATE For Sale / Trade Classifieds
4
Oct 7, 2015 06:26 PM
HumbleAg
PRIVATE For Sale / Trade Classifieds
1
Aug 14, 2011 07:35 AM