AC Blower fix
#231
 05-18-2013, 09:57 PM


im always curious about elect problems. how much is too much? how did you check the amp draw?
at highest speed the resistors are not in the circuit so only the motor draws current. is the current too high at the high speed?
usually IF it is a resistor problem the fan doesnt run at some speeds or not at all. the resistor pack is rarely the problem,usually its the connector that everybody fixes.
if the resistor is bad it cannot cause excess draw. it opens up.
when the conn goes bad it opens up, no current.
so how could you get excess amp draw?
Last edited by happythree; 05-18-2013 at 10:00 PM.
#232
05-19-2013, 12:38 AM

Ok, I read all of your fixes and am very impressed with what you've done.
This is what I did: I removed the resistor and unplugged it. After it was unplugged I took a small machinists awl or pick and with the pointed end I inserted it in the top of the connectors and bent the top or snap part down and then pulled the wires all out the back end. The only one that was hard to get out was the "A" wire because it was melted into the plug. When I got it out I had the wires and the plug separated. I found a dealer, Sands Chevrolet in Phoenix, Arizona who stocks a new plastic plug end and I bought one from them years ago; and it burned up, and this is now the second fix that I've done, since the last time I only put the new plug on and put the wires in place and plugged it back in. If your plug is burned, like mine is now, but not too badly you and use the existing plastic.
I then cut marked all of the wires, "A, B, C, D, E" according to their position on the resistor. If you look into the body of the resistor and on the plug you can see the corresponding marks there too.
I then bought some blue female wire connectors, making sure that I got the ones that were small and would fit the spades on the resistor and put them on all of the wires; cutting off just the old ends. I put the plastic end back in place on the resistor and shoved all of the new female connector ends back into their corresponding holes and made sure that they were well seated. The plastic connector separated them and kept them from grounding on eachother, thus eliminating the need to tape the ends.
Also, if you have a home improvement store or auto parts store in your area you can buy some shrink casing that you put on wires and heat them up with a hot blow dryer and that will shrink the casing over the connector ends and be a better fix than using tape, as tape may have a tendency to come loose or be too thick. The shrink casing is a great insulator.
I did this all while it was still in the Hummer and didn't take the harness out........as I knelt on the ground to do it.
I threw it all back together and "voila" my wife is happy and I don't have to worry about it again.
I'd post pics, except I can't see those that have been posted and so I've decided not to try.
Good luck!

#233
05-22-2013, 05:53 PM

i also did the soldering trick and it worked. Didn't even need to buy a new resistor. Just cliped the melted corner of the plug with wire cutters used skinny knife to clean it up and then used a small file to clean the metal pin then crimped and soldered the spade with wire. works great. I also used the paint on liquid electrical tape and then slid the heat shrink wrap on.

#235
07-28-2013, 09:10 PM

Sadly.... none of the pictures posted will show now  Is there another website to redirect them to?
Is there another website to redirect them to?
#236
07-28-2013, 09:13 PM
Common Hummer H3 Blower Problem
Does the AC light still come on but no air blows out?
Did you notice a burning smell just before the blower stopped working?
You may be a victim of a poor Generous Motors design for controlling blower speeds. With the technology available when Hummers were first made, it seems strange that GM did not implement a PWM system to control the blower speed in Hummers. That system would save energy, not produce heat like a resistor, to control the blower speed. It would have also allowed GM to put a continuously variable speed control on the Hummers for their customers, instead of a four speed switch.
Anyway, they didn�t do it, probably to save a few pennies per Hummer. So those of us who have had to put up with the failure of our blower system, have to dish out big bucks for getting our blowers working again. The repair is not a fix, because IT WILL FAIL again.
Now, you may be able to save those big bucks if you are half way handy with a soldering iron and a Dremel type tool. This may also prevent your blower speed control from failing again.
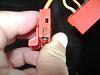
I assume you know the H3 blower motor and wiring harness is located behind the glove box. Remove glove box to start this project. Remove right end cover to dashboard. Remove blower plug, remove white gang plug, remove black gang plug, THEN remove resistor with connector attached last. Now take resistor and wiring harness to your work bench to start saving more money.
You may have to work to get the resistor removed from the connector as the burnt terminal inside has melted and fused the surrounding plastics together. Keep working at it, rock it back and forth, you will get it apart.
Now, does it look something like this?

Cut around the connector shield on the resistor to allow better access to the terminals. You can cut this with a Dremel type tool or with wire cutters like I did.


Now you can use a file, sandpaper, or a Dremel Type tool to clean and roughen up all the resistor terminals. This will allow the solder to better adhere to the terminals and give you a better connection. We don't want any cold solder joints here.

 A
ANext, cut the wires behind the connector on the harness so as to get us into some fresh, unburnt wire.


Take note of the wire colors and orientation at this point. We want all wires going back to their original terminal.

Carefully solder each wire to its corresponding terminal, making sure your soldering iron is strong enough and hot enough to make a good clean solder joint on each wire and terminal.

Reinstall the harness back into the vehicle first, and reinstall the resistor last. This will prevent any excess strain and pull on the resistor terminals.
Turn the key on and enjoy your AC blower once again! And it cost you nothing but time. If you made good solder joints, your blower should never fail again!
Good luck!
Craig
Is there another website to redirect them to?

#239
09-11-2013, 04:21 AM

Sounds like you all got lucky; my 06 H3 had the no blower issue, did what the tread says, found suspicious looking resister and harness, changed them, still no flow. Mine is the fan blower. Idk if it was resister since I did the lazy man thing and went right to YouTube. After (instead of before 111$ on parts that could have been fine) the harness/resister swap it still didn't work so I plugged a voltage gauge into it and got nothing while fan switch off, 14v when switched on so there is current. (Didn't test the 1st 1 like I should have) 1st pull off the connector that goes to the fan motor (has only 2 wires in it and goes on the motor housing) and check it with fan controls off 0 volts, turn in fan, 12-14v reading, then it's going to be your fan motor. DO THE TEST 1st!
#240
09-12-2013, 12:35 PM
Great information here guys! Just wish there was a PERMANENT FIX  vs the band aid of replacing the resistor/connector
") . Seems the MAJOR issue is that the resistor is INSIDE the HVAC system, so when the HEAT is blowing, the resistor is already screaming hot and no way to cool off ... thoughts on that???
. Seems the MAJOR issue is that the resistor is INSIDE the HVAC system, so when the HEAT is blowing, the resistor is already screaming hot and no way to cool off ... thoughts on that??? 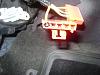
vs the band aid of replacing the resistor/connector. Seems the MAJOR issue is that the resistor is INSIDE the HVAC system, so when the HEAT is blowing, the resistor is already screaming hot and no way to cool off ... thoughts on that??? 


