Shifter Cable .. New or easy repair ?
#1
 08-06-2012, 12:46 PM


Join Date: Sep 2011
Location: Sunshine state , MIami
Posts: 1,293
OK As I post it before the plastic bushing that hold the shifter cable to the trans break as I found to be a very common issue I was thinking instead of replacing the whole cable for a OEM new , I will try to fix it and maybe comes even better ...
What do you expert think .
1- Removing the brake
2- remove the link with the small ball
3-attach a screw
4-use a bushing kit from autopart to cover the space between the cable head and the screw , also to make smooth transition for the shift
5-lock nut to hold the cable in place ...
This way even if the bushing break the shifter cable will still be connected to the trans . preventing the truck to got stuck in one gear
Opinions welcome
#2
09-25-2012, 10:01 PM

H2 Miami, That sounds like a great idea.
My wife got stranded at the bank today due to this fragile brittle plastic piece. There is not much sense in putting the same thing back.
In aviation they always have important (carburator), rod ends attached with a large washer so that even if the bearing fails the rod will still stay connected.
I will install a bronze bushing in there and attach it with a bolt and a fender washer.
Thanks for the good idea,
John
#3
09-26-2012, 08:31 AM
Join Date: Sep 2011
Location: Sunshine state , MIami
Posts: 1,293
I ended replacing it for the OEM , I got it very cheap from the dealer but yes a forever fix is to replace the plastic dumb bushing ...
please post pics as you do the job .
Sounds like you are doing it right
please post pics as you do the job .
Sounds like you are doing it right
#4
09-27-2012, 09:06 AM
I sure didn't like the idea of driving 40 miles to pay $70+ for a new cable that probably still has the same problematic plastic bushing.
I took H2Miami's lead and made a bolt stud and bushed the cable end with bronze.
This fix is not for everyone because it required a bit of modifying the transmission shift lever and filing a bushing, etc,..
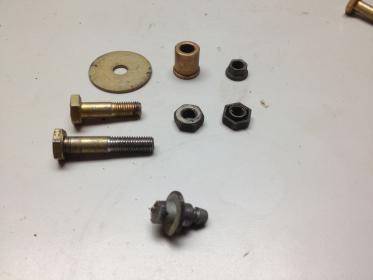
I had this miscellaneous hardware from other various aircraft projects. It is all available through Aircraft Spruce.
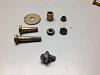
The bolt is a 1/4" by 1 or 1 1/8 long fine thread
It helps if you can thread a bit more on the shank like the first bolt so it can easily accomondate two nuts and the shift lever.
I used a standard 1" bolt with a thin nut on the inside and a high temp (steel only) lock nut on the outside. This cable is near the exhaust and catlytic converter so I did not want to use a standard nylon lock nut.
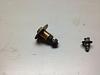
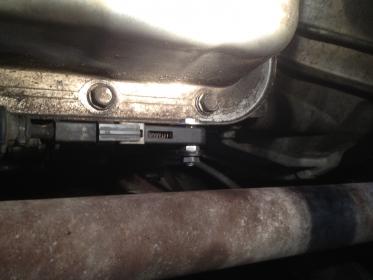
I first removed the transmission shift lever and ground off the back of the stud so it could be punched out of the lever. (this leaves a hole slightly larger than 1/4").
I had a bronze bushing 1/4" id by 7/16 od and 1/2 long. This is just few thousandths larger than the shift cable hole so I turned down the bushing so it would not crack the plastic when pushed in. I did make it a light press fit so it should not rotate in the plastic.
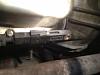
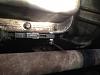
I locked it down to where the bushing is free to rotate on the bolt but the stud is secure. A longer bolt with more threads is better and I might change it at the next oil change.
This should last a whole lot longer than the plastic insert.
Thanks H2Miami for the idea.
John
I took H2Miami's lead and made a bolt stud and bushed the cable end with bronze.
This fix is not for everyone because it required a bit of modifying the transmission shift lever and filing a bushing, etc,..
I had this miscellaneous hardware from other various aircraft projects. It is all available through Aircraft Spruce.

The bolt is a 1/4" by 1 or 1 1/8 long fine thread
It helps if you can thread a bit more on the shank like the first bolt so it can easily accomondate two nuts and the shift lever.
I used a standard 1" bolt with a thin nut on the inside and a high temp (steel only) lock nut on the outside. This cable is near the exhaust and catlytic converter so I did not want to use a standard nylon lock nut.
I first removed the transmission shift lever and ground off the back of the stud so it could be punched out of the lever. (this leaves a hole slightly larger than 1/4").
I had a bronze bushing 1/4" id by 7/16 od and 1/2 long. This is just few thousandths larger than the shift cable hole so I turned down the bushing so it would not crack the plastic when pushed in. I did make it a light press fit so it should not rotate in the plastic.


I locked it down to where the bushing is free to rotate on the bolt but the stud is secure. A longer bolt with more threads is better and I might change it at the next oil change.
This should last a whole lot longer than the plastic insert.
Thanks H2Miami for the idea.
John
#5
09-27-2012, 02:39 PM
Join Date: Sep 2011
Location: Sunshine state , MIami
Posts: 1,293
Man thats the right way , I got lazy and use the OEM but I will keep checkingthe plastic bushing if I see any fail I will fixit that way.good job
I sure didn't like the idea of driving 40 miles to pay $70+ for a new cable that probably still has the same problematic plastic bushing.
I took H2Miami's lead and made a bolt stud and bushed the cable end with bronze.
This fix is not for everyone because it required a bit of modifying the transmission shift lever and filing a bushing, etc,..
I had this miscellaneous hardware from other various aircraft projects. It is all available through Aircraft Spruce.
Attachment 5497
Attachment 5498
The bolt is a 1/4" by 1 or 1 1/8 long fine thread
It helps if you can thread a bit more on the shank like the first bolt so it can easily accomondate two nuts and the shift lever.
I used a standard 1" bolt with a thin nut on the inside and a high temp (steel only) lock nut on the outside. This cable is near the exhaust and catlytic converter so I did not want to use a standard nylon lock nut.
I first removed the transmission shift lever and ground off the back of the stud so it could be punched out of the lever. (this leaves a hole slightly larger than 1/4").
I had a bronze bushing 1/4" id by 7/16 od and 1/2 long. This is just few thousandths larger than the shift cable hole so I turned down the bushing so it would not crack the plastic when pushed in. I did make it a light press fit so it should not rotate in the plastic.
Attachment 5496
Attachment 5499
Attachment 5500
I locked it down to where the bushing is free to rotate on the bolt but the stud is secure. A longer bolt with more threads is better and I might change it at the next oil change.
This should last a whole lot longer than the plastic insert.
Thanks H2Miami for the idea.
John
#6
09-04-2014, 10:40 AM

Please help....I am a new owner...(recently my father passed away, so I now drive my mother around in their bright yelow, very big Hummer2)
Friday, the shifter would not engage into any of the gears...I had it towed to a local Chevrolet dealership..and as of today, they havent even looked at it....so I am picking it back up and towing back to my house and plan to fix this myself....can a very determined lady with no vehicle knowledge or experience fix this without a lot of cost......Please offer any advice you have....thanks..
Friday, the shifter would not engage into any of the gears...I had it towed to a local Chevrolet dealership..and as of today, they havent even looked at it....so I am picking it back up and towing back to my house and plan to fix this myself....can a very determined lady with no vehicle knowledge or experience fix this without a lot of cost......Please offer any advice you have....thanks..

#8
09-04-2014, 09:09 PM

here is what saved my shifter cable situation ( Jsbihn's idea)

read on this post to see how it works ...
https://www.hummerforums.com/forum/h...t-32747/page2/
read on this post to see how it works ...
https://www.hummerforums.com/forum/h...t-32747/page2/
Last edited by hmer; 09-04-2014 at 09:11 PM.
#9
09-05-2014, 05:26 AM

Hmer,
Thanks Yeah 3 years and still shifting strong
Miami.
I did a revamp on the shifter lever where I bought a new GM shifter lever, pulled the riveted/pressed in rod and replaced it with a bolt that would allow a nylon filled nut to be put on it (along with a washer on both sides of the cable).
Cost me all of 15 bucks I think but the nylox nut that I did in a quick repair (like Hmer shown) has been going strong after 3 years.
Sure if this breaks I will replace it with the revamped shifter, but for $2.50... well it is defiitely a cheap and A+ fix.
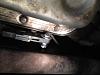
Hope Angel, sounds like you have the broken shifter bushing issue. It is simple, get the $2.50 pack at AutoZone, O'reillys, Advanced Auto, or wherever and get under the truck. You should see the shifter cable (which is RIGHT next to the trans on the underpart) flopping around loose. Put it back on the lever and push hard in one of the nylox nuts.
Fixed.
Thanks Yeah 3 years and still shifting strong
Miami.
I did a revamp on the shifter lever where I bought a new GM shifter lever, pulled the riveted/pressed in rod and replaced it with a bolt that would allow a nylon filled nut to be put on it (along with a washer on both sides of the cable).
Cost me all of 15 bucks I think but the nylox nut that I did in a quick repair (like Hmer shown) has been going strong after 3 years.
Sure if this breaks I will replace it with the revamped shifter, but for $2.50... well it is defiitely a cheap and A+ fix.
Hope Angel, sounds like you have the broken shifter bushing issue. It is simple, get the $2.50 pack at AutoZone, O'reillys, Advanced Auto, or wherever and get under the truck. You should see the shifter cable (which is RIGHT next to the trans on the underpart) flopping around loose. Put it back on the lever and push hard in one of the nylox nuts.
Fixed.
Last edited by jsbihn; 09-05-2014 at 05:29 AM.
#10
09-05-2014, 07:14 AM
Thanks to all the responses, I will try the cheaper fix and work my way up.....If the cable itself is broken, will a kick down cable kit fix the problem?? It's $66.79 put out by Autoloc.... I am def learning more about this Hummer....lol....Its awesome, I can slide right up under it without lifting it up....... Thanks again...
Thanks again...

